Containers with Slurm 🚢
What are containers?
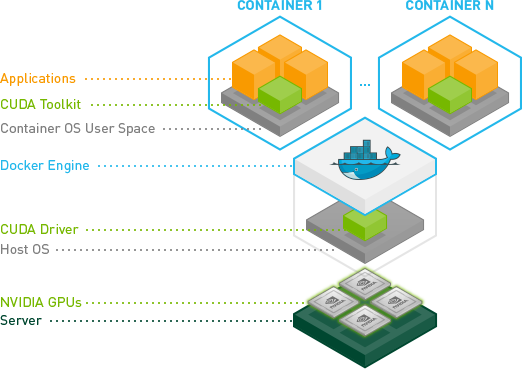
Containers are a great way to package software, they wrap the runtime of the software up with the application’s code. This allows you to pull down optimized software containers and run them out of the box without all the complications of compiling them for a new system. In this blog we’ll focus on the nvidia container repository (ngc) since they have optimized containers for applications like gromacs, nemo, and BERT.
Containers in HPC
What are the issues with using docker containers in traditional HPC clusters?
Containers typically require a privileged runtime, i.e. the person invoking the container needs sudo access. This is a problem for HPC clusters which are typically multi-user environments with POSIX file permissions used to give access to certain files and directories based on users and groups.
To solve this Nvidia published enroot - this uses the linux kernel feature chroot(1) to create an isolated runtime environment for the container. Think of this like creating a mount point /tmp/container in which the container can only see it’s local directory i.e. container/. This serves to separate the outside OS from the container’s runtime. Here’s an example of enroot in action:
# Import and start an Amazon Linux image from DockerHub
$ enroot import docker://amazonlinux:latest
$ enroot create amazonlinux+latest.sqsh
$ enroot start amazonlinux+latest
In the above example we imported a container from dockerhub, converted it to an enroot container with enroot create and then ran it with enroot start.
So how do you schedule and run containers with Slurm?
Slurm provides a container capability for OCI containers that’s imho pretty awful. It requires users to pull down their container images, convert them to an OCI runtime, then point slurm at that OCI image. To solve this, Nvidia introduced Pyxis which is a plugin for Slurm that allows you to run containers using the native OCI runtime capabilities and only specifying the container uri, i.e. amazonlinux/latest. An example of this is like so:
#!/bin/bash
#SBATCH --container-image nvcr.io\#nvidia/pytorch:21.12-py3

python -c 'import torch ; print(torch.__version__)'
Pretty cool right?
Containers on ParallelCluster
So how do we set this all up with AWS ParallelCluster?
To set this up with AWS ParallelCluster we’re first going to setup the cluster with a managed post-install script that installs pyxis and enroot and another script that installs docker.
- Create a cluster with the following post-install script on both the Head Node and Compute Nodes. In the below examples we’ll use the cuda:11.6.2 which requires a GPU-based instance like the g4dn or g5.
 CustomActions:
    OnNodeConfigured:
      Script: https://raw.githubusercontent.com/aws-samples/aws-parallelcluster-post-install-scripts/main/multi-runner/postinstall.sh
      Args:
        - https://raw.githubusercontent.com/aws-samples/aws-parallelcluster-post-install-scripts/main/pyxis/postinstall.sh
        - -/fsx
        - https://raw.githubusercontent.com/aws-samples/aws-parallelcluster-post-install-scripts/main/docker/postinstall.sh
- After the cluster creates or updates, SSH into the Head Node. We can test that pyxis and enroot installed correctly by running the cuda:11.6.2 ubuntu image:
[ec2-user@ip-172-31-28-27 ~]$ srun --container-image=nvidia/cuda:11.6.2-base-ubuntu20.04 nvidia-smi
pyxis: importing docker image: nvidia/cuda:11.6.2-base-ubuntu20.04
pyxis: imported docker image: nvidia/cuda:11.6.2-base-ubuntu20.04
Tue May 16 22:07:21 2023
+-----------------------------------------------------------------------------+
| NVIDIA-SMI 470.141.03   Driver Version: 470.141.03   CUDA Version: 11.6     |
|-------------------------------+----------------------+----------------------+
| GPU  Name        Persistence-M| Bus-Id        Disp.A | Volatile Uncorr. ECC |
| Fan  Temp  Perf  Pwr:Usage/Cap|         Memory-Usage | GPU-Util  Compute M. |
|                               |                      |               MIG M. |
|===============================+======================+======================|
|   0  Tesla T4            Off  | 00000000:00:1E.0 Off |                    0 |
| N/A   40C    P0    27W /  70W |      0MiB / 15109MiB |      0%      Default |
|                               |                      |                  N/A |
+-------------------------------+----------------------+----------------------+

+-----------------------------------------------------------------------------+
| Processes:                                                                  |
|  GPU   GI   CI        PID   Type   Process name                  GPU Memory |
|        ID   ID                                                   Usage      |
|=============================================================================|
|  No running processes found                                                 |
+-----------------------------------------------------------------------------+
- This can also be run in a sbatch script like so. Think of this as the equivalent of
docker run nvidia/cuda:11.6.2-base-ubuntu20.04 nvidia-smion the compute node.
#!/bin/bash
#SBATCH --container-image=nvidia/cuda:11.6.2-base-ubuntu20.04

nvidia-smi
Multi-Node parallel (MPI)
Pyxis is compiled as a Slurm (Spank) plugin, this means it can read from the Slurm parameters in order to run across multiple nodes, for example we can run a MPI hello world job. To do this we’ll start from a openmpi container and build the mpi_hello_world.c program there.
- Create a
Dockerfilewith the following contents
# syntax=docker/dockerfile:1.4
FROM mfisherman/openmpi

COPY <<EOF mpi_hello_world.c
#include <stdio.h>
#include <stdlib.h>
#include <mpi.h>
#include <unistd.h>

int main(int argc, char **argv){
  int step, node, hostlen;
  char hostname[256];
  hostlen = 255;

  MPI_Init(&argc,&argv);
  MPI_Comm_rank(MPI_COMM_WORLD, &node);
  MPI_Get_processor_name(hostname, &hostlen);

  for (step = 1; step < 5; step++) {
    printf("Hello World from Step %d on Node %d, (%s)\n", step, node, hostname);
    sleep(2);
  }

 MPI_Finalize();
}
EOF

RUN mpicc mpi_hello_world.c -o mpi_hello_world
- Create the docker image and import it with enroot:
export DOCKER_BUILDKIT=1
docker build -t mpi-hello-world .
enroot import dockerd://mpi-hello-world:latest
- Run the image with Slurm using the
sruncommand:
srun -n 4 --container-image=./mpi-hello-world+latest.sqsh mpirun ./mpi_hello_world