Cost Explorer with AWS ParallelCluster 📊

Cost Explorer allows you to track cost at the cluster, queue, user and job level. It does this by tracking tags applied automatically to EC2 Instances launched with parallelcluster.
This gives users a view of exactly how much a cluster costs overtime, it tracks:
- EC2 Instances
- EBS Volumes
FSx Lustre VolumesEFS VolumesData Transfer
Setup
Ok so how do we set this up?
- Activate the
parallelcluster:cluster-nametag in the Billing Dashboard > Cost Allocation Tags

Update: as of June 8th 2022, you can activate these tags programmatically from the AWS API, CLI or SDK.
Wait 24 hours 📆 🥱
- Then go to Cost Explorer > Click on Tags on the right side and select
parallelcluster:cluster-nameand the cluster you wish to display the cost of. If you don’t see the tag, it’s most likely since it hasn’t been 24 hours since you activated it 🥱.
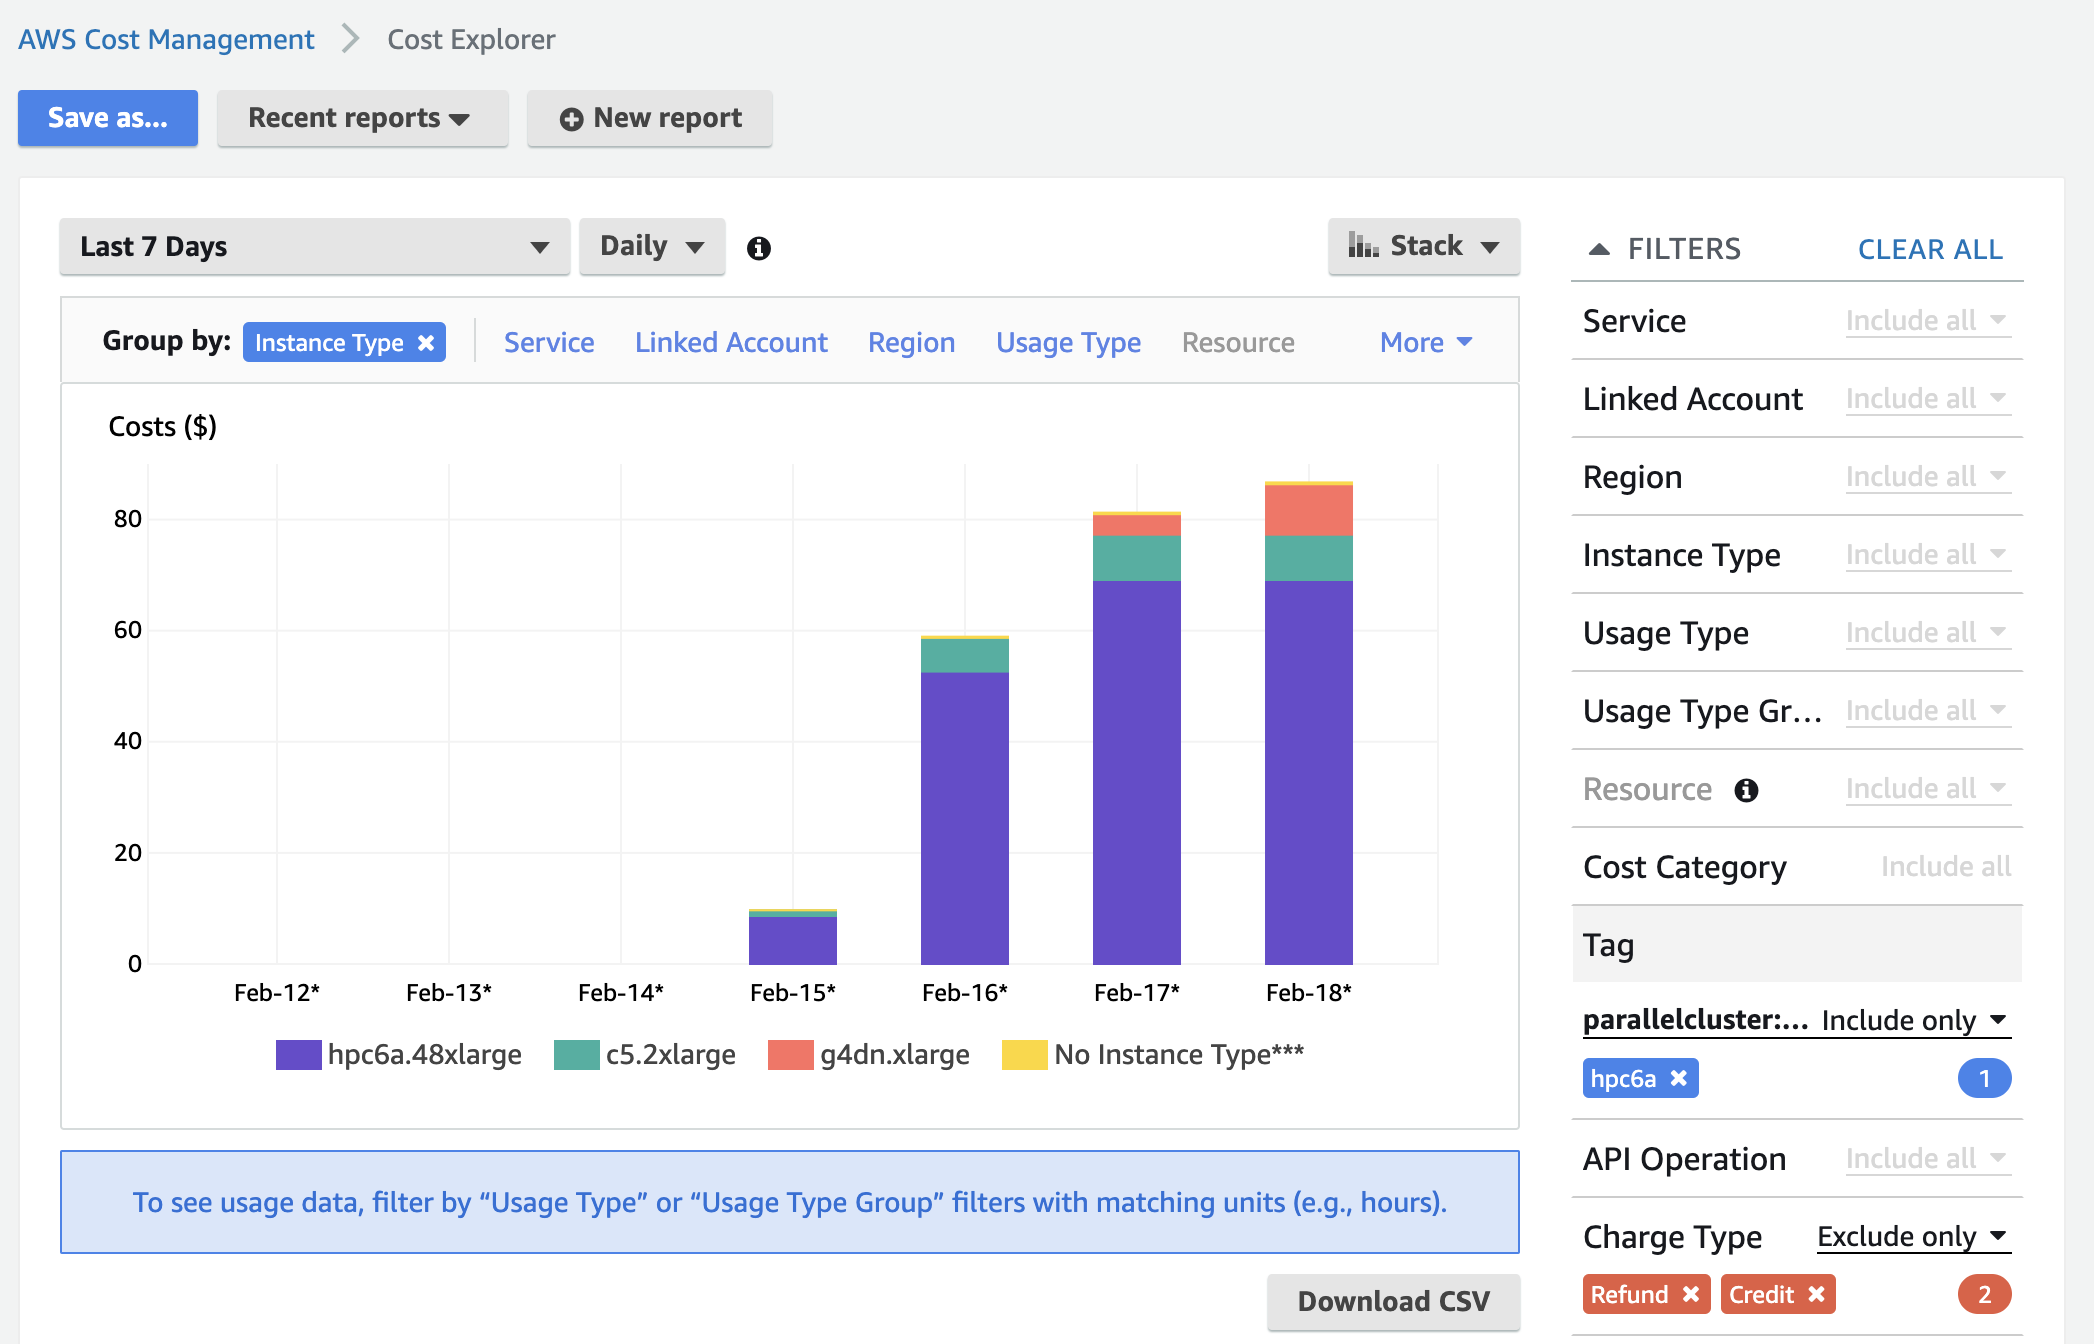
You can group by Instance Type to breakdown cost by instance type, you can group by Service to break down costs between EC2, EBS, ect.
Custom Tags
You can also track resources based on custom tags, such as user, job id, project, ect… Please keep in mind the following caveats:
- Jobs must use up a full instance, i.e. multiple jobs cannot run on the same instance at the same time. We accomplish this in the script below with the
--exclusiveflag. - Jobs that span more than one instance need to apply the tag to each instance. Slurm only executes the sbatch script on the first instance in the reservation. To do this you can wrap the
aws create-tagscommand inmpirun.
Setup
-
Step 1 is to add permissions to create those tags. Create an IAM role called
pclustertaggingwith the following content:{ "Version": "2012-10-17", "Statement": [ { "Effect": "Allow", "Action": [ "ec2:DeleteTags", "ec2:DescribeTags", "ec2:CreateTags" ], "Resource": "*" } ] } -
Next attach it to the head node and compute nodes in the cluster using the AdditionalIamPolicies parameter.
Iam: AdditionalIamPolicies: - Policy: arn:aws:iam::822857487308:policy/pclustertagging -
Finally we’ll change the ScaleDownIdleTime parameter to
1. This helps ensure that each job gets a dedicated instance provisioned to it and doesn’t re-use an existing instance. Tagging will only work if each job is assigned a unique instance, cost-explorer doesn’t split instance runtime based on when the tag was updated, it’ll count the whole instance runtime to the last tag applied.SlurmSettings: ScaledownIdletime: 1 -
Update the cluster to apply these changes.
-
Next we’ll create a Slurm Prolog script to automatically tag instances prior to job launch:
#!/bin/sh # get IMDSv2.0 token TOKEN=$(curl -X PUT "http://169.254.169.254/latest/api/token" -H "X-aws-ec2-metadata-token-ttl-seconds: 21600") # get instance id instance_id=$(curl -s -H "X-aws-ec2-metadata-token: $TOKEN" http://169.254.169.254/latest/meta-data/instance-id) region=$(curl -s -H "X-aws-ec2-metadata-token: $TOKEN" http://169.254.169.254/latest/dynamic/instance-identity/document | jq -r '.region') # tag instance with job-id aws --region ${region} ec2 create-tags --resources ${instance_id} --tags Key=parallelcluster:job-id,Value=${SLURM_JOB_ID} # tag instance with user aws --region ${region} ec2 create-tags --resources ${instance_id} --tags Key=parallelcluster:user,Value=${SLURM_JOB_USER} # tag instance with job name aws --region ${region} ec2 create-tags --resources ${instance_id} --tags Key=parallelcluster:job-name,Value=${SLURM_JOB_NAME} -
Move it to the right directory and make it executable, i.e.:
sudo su
mv prolog.sh /opt/slurm/etc/prolog.sh
chmod 744 /opt/slurm/etc/prolog.sh

echo "Prolog=/opt/slurm/etc/prolog.sh" >> /opt/slurm/etc/slurm.conf
systemctl restart slurmctld
In the following table I list environment variables that can be used for the tag:
Environment Variable Description User $SLURM_JOB_USERUser submitting the job. Job ID $SLURM_JOB_IDJob ID assigned by Slurm. Project $SLURM_JOB_NAMEJob name can be used to track project / application, i.e. cfdorfeaAccount $SLURM_JOB_ACCOUNTSlurm account setup by sacct. Comment $SLURM_JOB_COMMENTThis can be used for any other categorization you want to apply. Users specify the comment at job submission time with sbatch --comment .... -
Now users can submit a job like normal, keep in mind they should use the
--exclusiveflag to ensure the instance isn’t shared with another job (and thus tag is overwritten):sbatch --exclusive submit.sh -
Now when the job is launched you can run a similar query on cost explorer but get data from these tags. In the following example I added a tag
parallelcluter:projectand then used that to see aggregate project costs across all my clusters.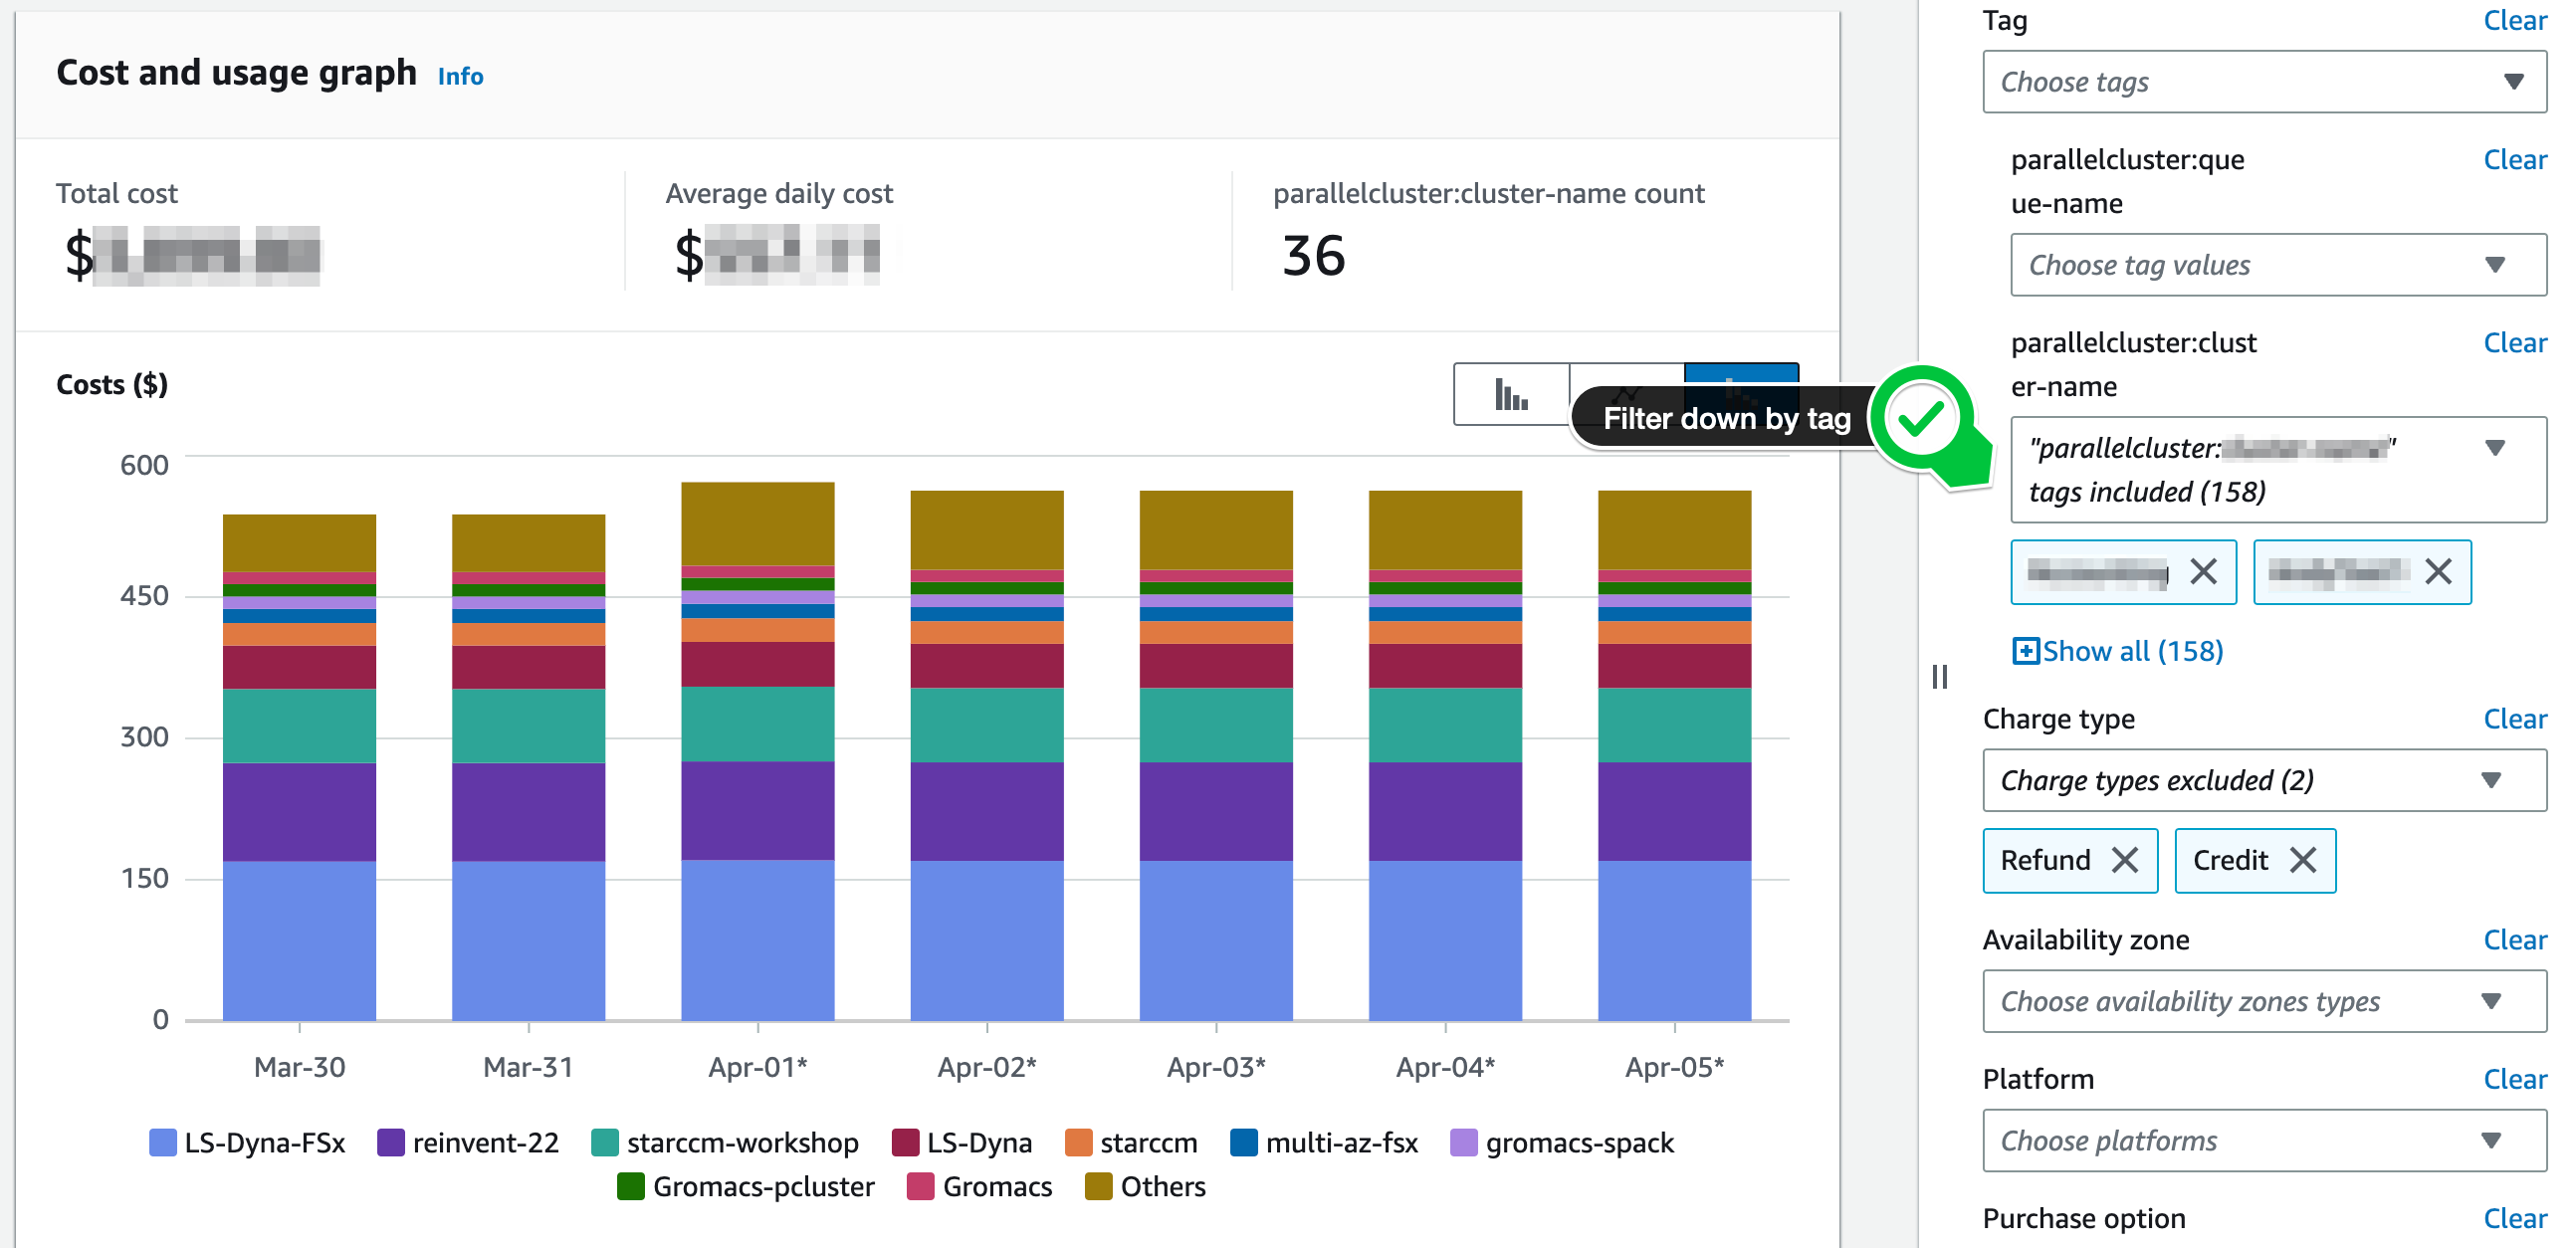
Troubleshooting
Previously the above script was written for IMDS v1.0, however when creating a cluster with ParallelCluster UI, it’ll default to IMDS v2.0 causing errors in the old script. The solution is:
-
First check your parallelcluster config to see if has v2.0 enforced, if so, it’ll show:
Imds: ImdsSupport: v2.0 -
Update the script to the version shown above, it’ll have a line with
TOKEN=$(...)if it supports IMDS v2.0.