Setup Amazon File Cache with AWS ParallelCluster 🗂
![]()
Amazon File Cache is a new service that provides a cache to use on-prem data in the cloud but it has a few advantages over SCP/SFTP and Datasync.
- Single namespace - files & metadata are copied up and down transparently to the user
- Support for S3 and NFSv3 (Not NFSv4 as of this writing)
- Lazy Loading - files are pulled in as needed, resulting in a smaller overall cache size
So when should you use File Cache?
- Running a hybrid HPC workload when the data is in an on-premises NFS (NFSv3) file system
- When you need to cache an S3 bucket/prefix that contains billions of objects
- Cross region import and export data from S3 into the cache
So when shouldn’t you use File Cache?
- Syncing data from a S3 Bucket in the same region - Just use FSx Lustre, it’s 1/2 the cost.
- Syncing from a non-NFS source filesystem - use datasync or transfer family.
Setup
From the AWS ParallelCluster docs we learn:
If using an existing file system (same for cache), it must be associated to a security group that allows inbound TCP traffic to port 988.
So we’ll need to:
- Create the Security Group
- Create the cache & associate the security group
- Create a cluster that mounts the cache
Since File Cache is built on the popular Lustre client, it requires no extra installation in AWS ParallelCluster image. We just need to mount the filesystem.
1. Create Security Group
-
Create a new Security Group by going to Security Groups > Create Security Group:
- Name
Amazon File Cache - Description
Allow Amazon File Cache to mount to ParallelCluster - VPC
Same as pcluster vpc

- Name
-
Create a new Inbound Rule
- Custom TCP
- Port
988 - Same CIDR as the VPC
172.31.0.0/16

-
Leave Outbound Rules as the default:

2. Create Amazon File Cache
-
Go to the Amazon Console and click Create Cache.
-
Next give it a name and set the size, (smallest is
1.2TB)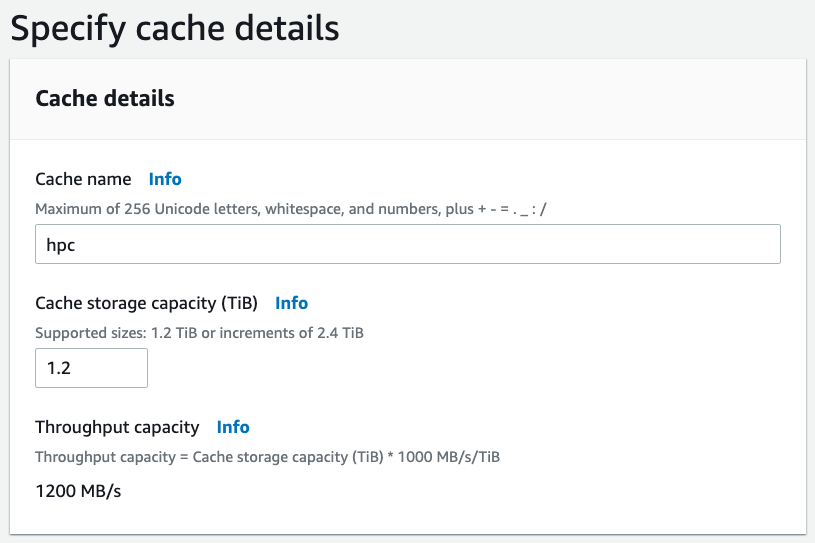
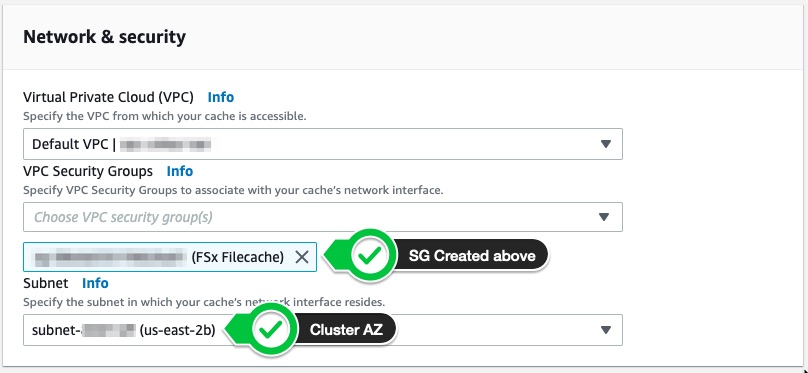
-
On the next section specify the same VPC and subnet as your cluster and make sure to select the Security Group you created earlier.
4. Create a Data Repository Association
Like FSx Lustre, File Cache has the notion of Data Repository Associations (DRA). This allows you to link either an S3 bucket in another region or a NFSv3 based filesystem. All the metadata will be imported automatically and files will be lazy loaded into the cache.
-
Create your DRA like so:

-
On the next screen review all the information and click “Create”.
5. Attach Cache to AWS ParallelCluster
-
After the cache has finished creating, grab the mount command from the Amazon console:
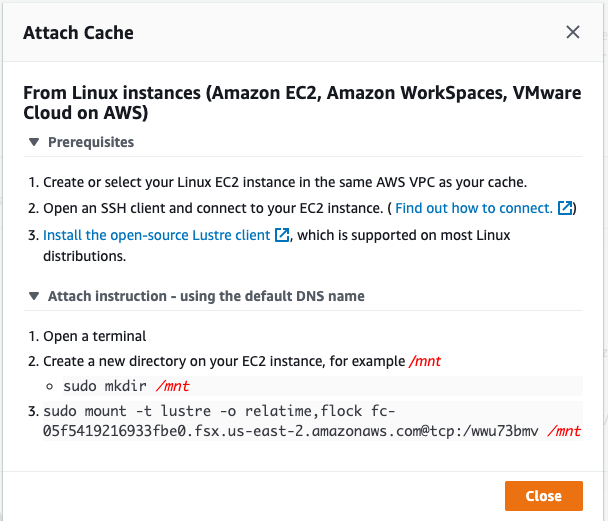
We’ll use the DNS name (including mount dir) to mount the cache below.
-
SSH into the HeadNode and create a script
mount-filecache.shwith the following content:Note on Lustre client version: Lustre client version
2.12is required for filecache metadata lazy load to work. This requires kernel version> 5.10which is in the latest Amazon Linux 2 AMI. It’s upgraded in the script below by runningsudo yum install -y lustre-client. You can check version compatibility here: https://docs.aws.amazon.com/fsx/latest/LustreGuide/install-lustre-client.html#lustre-client-amazon-linux#lustre-client-matrix.#!/bin/bash # usage: mount-filecache.sh fc-05f5419216933fbe0.fsx.us-east-2.amazonaws.com@tcp:/wwu73bmv /mnt FSX_DNS=$1 MOUNT_DIR=$2 . /etc/parallelcluster/cfnconfig test "$cfn_node_type" != "HeadNode" && exit # create a directory mkdir -p ${MOUNT_DIR} # upgrade lustre version sudo yum install -y lustre-client # mount on head node sudo mount -t lustre -o relatime,flock ${FSX_DNS} ${MOUNT_DIR} cat << EOF > /opt/slurm/etc/prolog.sh #!/bin/sh if mount | /bin/grep -q ${MOUNT_DIR} ; then exit 0 else # upgrade lustre version sudo yum install -y lustre-client # create a directory sudo mkdir -p ${MOUNT_DIR} # mount on compute node sudo mount -t lustre -o relatime,flock ${FSX_DNS} ${MOUNT_DIR} fi EOF chmod 744 /opt/slurm/etc/prolog.sh echo "Prolog=/opt/slurm/etc/prolog.sh" >> /opt/slurm/etc/slurm.conf systemctl restart slurmctld -
Then run it from the HeadNode, specifying the filesystem DNS and mount directory like so:
FILECACHE_DNS=fc-05f5419216933fbe0.fsx.us-east-2.amazonaws.com@tcp:/wwu73bmv MOUNT_DIR=/mnt sudo bash mount-filecache.sh ${FILECACHE_DNS} ${MOUNT_DIR} -
To verify that the filesystem mounted properly, you can run
df -h. You should see a line like:df -h ... 172.31.47.168@tcp:/wwu73bmv 1.2T 11M 1.2T 1% /mnt -
Next let’s allocate a compute node to ensure it gets mounted there as well:
salloc -N 1 # wait 2 minutes watch squeue # ssh into compute node once job goes into R ssh queue0-dy-queue0-hpc6a48xlarge-1If all worked properly you should again see:
df -h
...
172.31.47.168@tcp:/wwu73bmv  1.2T   11M  1.2T   1% /mnt