Setup Gromacs On AWS ParallelCluster 🧬
Note: this has been turned into an AWS Workshop! 🚀 Check it out: Gromacs on AWS ParallelCluster
![]()
Gromacs is a popular open source Molecular Dynamics application. It supports GPU and CPU acceleration and supports multi-node processing using MPI. In the following guide we’ll setup a MPI compatible version of Gromacs using Spack package manager.
Setup
-
In this guide, I’ll assume you already have AWS ParallelCluster Manager setup, if you don’t follow the instructions on hpcworkshops.com to get started.
-
Setup cluster with the following config gromacs-config.yaml. Some of the important options include:
| Parameter | Description |
|---|---|
| Shared Storage | This sets up a 1.2 TB lustre drive and mounts it at /shared |
| HeadNode | This sets up a c5a.2xlarge instance as the head node. It has 8 hyper-threaded cpus and 16 gigs of memory. This is ideal for small computational tasks such as post-processing and installing software. |
| ComputeNodes | This sets up a queue of hpc6a.48xlarge instances. These instances have 96 physical cores and 384 GB of memory. These instances are ideal for tightly coupled compute. Note these instances don’t start running until we submit a job. |
-
Install Spack
sudo su export SPACK_ROOT=/shared/spack mkdir -p $SPACK_ROOT git clone -c feature.manyFiles=true https://github.com/spack/spack $SPACK_ROOT cd $SPACK_ROOT exit echo "export SPACK_ROOT=/shared/spack" >> $HOME/.bashrc echo "source \$SPACK_ROOT/share/spack/setup-env.sh" >> $HOME/.bashrc source $HOME/.bashrc sudo chown -R $USER:$USER $SPACK_ROOT -
Setup the Spack Binary Cache to speedup the build
spack mirror add binary_mirror https://binaries.spack.io/releases/v0.18 spack buildcache keys --install --trust -
Next we’ll use Spack to install the Intel Compilers (ICC), which we’ll use to compile gromacs.
spack install intel-oneapi-compilers@2022.0.2This will take about
~4 minsto complete. Once it’s complete, tell Spack about the new compiler by running:spack load intel-oneapi-compilers spack compiler find spack unloadNow intel will show up as an option when we run
spack compilersspack compilers -
Now that we’ve installed the intel compiler, we can proceed to install Gromacs.
spack install -j 8 gromacs +blas +lapack %intel ^intel-oneapi-mpi -
This will take
~45 minutes. After it completes, we can see the installed packages with:spack find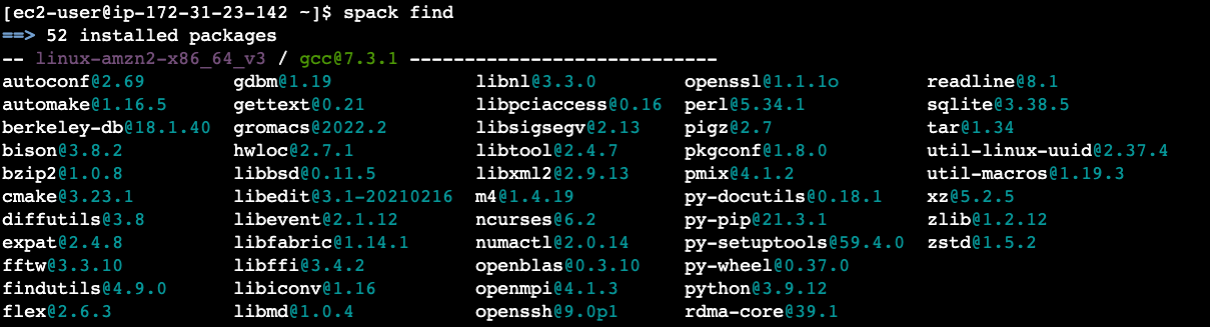
-
Now we can load in gromacs and test that it works. You should see the help message from
gromacs.spack load gromacs gmx_mpi
Dataset
-
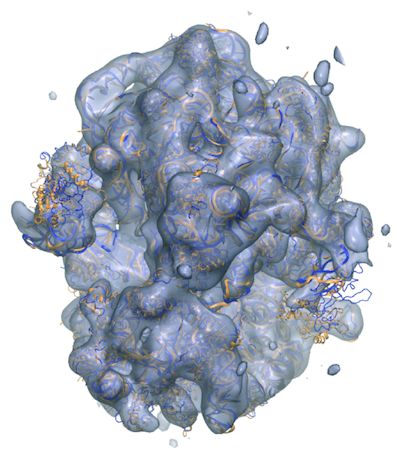
Download sample data sets from the Max Planck Institue in Göttingen
One of the datasets we download is the benchRIB Molecule, which looks like:
mkdir -p /shared/input/gromacs
mkdir -p /shared/logs
mkdir -p /shared/jobs

cd /shared/input/gromacs
wget https://www.mpinat.mpg.de/benchMEM
wget https://www.mpinat.mpg.de/benchPEP.zip
wget https://www.mpinat.mpg.de/benchPEP-h.zip
wget https://www.mpinat.mpg.de/benchRIB.zip

# unzip
unzip bench*.zip
Run
-
First, create a bash script
gromacs.sbatchto submit jobs with:#!/bin/bash #SBATCH --job-name=gromacs-hpc6a-threadmpi-96x2 #SBATCH --exclusive #SBATCH --output=/shared/logs/%x_%j.out #SBATCH --partition=hpc6a #SBATCH -N 2 NTOMP=1 mkdir -p /shared/jobs/${SLURM_JOBID} cd /shared/jobs/${SLURM_JOBID} spack load gromacs spack load intel-oneapi-mpi@2021.5.1%intel@2021.5.0 arch=linux-amzn2-zen2 set -x time mpirun -np 192 gmx_mpi mdrun -ntomp ${NTOMP} -s /shared/input/gromacs/benchRIB.tpr -resethway -
Submit the job:
sbatch gromacs.sbatch -
We can monitor the job state with
watch squeue. Once it transitions into running we’ll see:$ watch squeueFrom there you can ssh into one of the compute nodes and run
htopto see resource consumption. If it’s running properly, you’ll see a htop output like: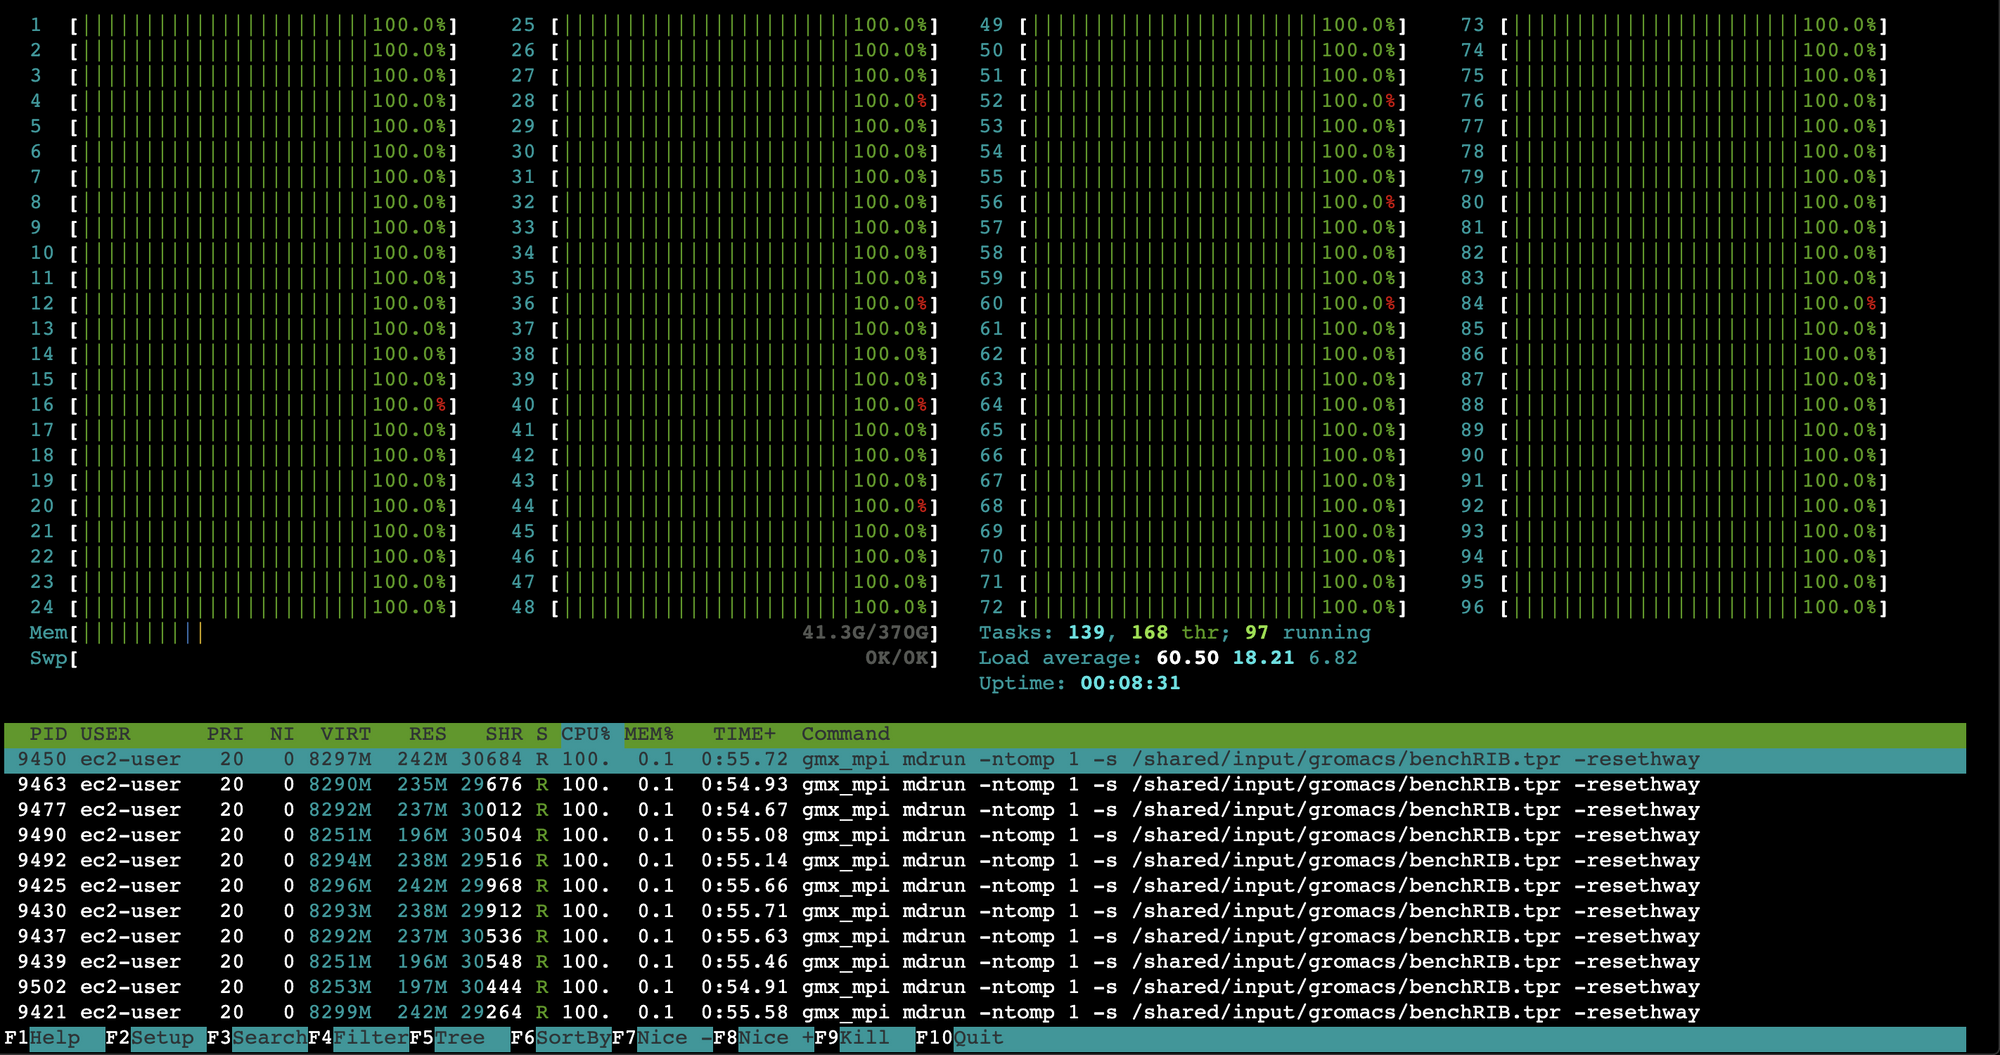
Post-Processing
-
Install
PyMolon the HeadNodesudo amazon-linux-extras install epel sudo yum update -y sudo yum groupinstall -y "Development Tools" sudo yum install -y python3-devel glew-devel glm-devel libpng-devel libxml2-devel freetype-devel freeglut-devel qt5-qtbase pip3 install --user virtualenv virtualenv ~/hpc-ve source ~/hpc-ve/bin/activate pip3 install aws-parallelcluster==3.* nodeenv PyQt5 nodeenv -p -n lts git clone https://github.com/schrodinger/pymol-open-source.git cd pymol-open-source python setup.py install --prefix=~/hpc-ve/ --no-vmd-plugins which pymol -
Then open up a DCV Session from Pcluster Manager:

-
On the DCV session, open a terminal window and run:
source ~/hpc-ve/bin/activate pymol -
Now, in the pymol console run:
fetch 1bl8 -
Your output should look similar to the following:
