LS-Dyna with AWS ParallelCluster 🚗

LS-Dyna is a popular Finite Element Analysis (FEA) Simulation software that uses explicit time integration, it’s commonly used in automotive to simulate crashes but can simulate any type of impact. It was originally developed at Lawrence Livermore National Lab then spun out into it’s own company (LSTC) before Ansys bought the company in 2019. Many of the artifacts from the LSTC days still exist, such as the LSTC license manager, ftp site ect.
Step 1: Setup a Cluster
-
I’ll also assume you have AWS ParallelCluster Manager setup, if you don’t follow the instructions on hpcworkshops.com to get started.
-
Setup cluster with the following config ls-dyna-config.yaml. Some of the important options include:
| Parameter | Description |
|---|---|
| Shared Storage | This sets up a 1.2 TB lustre drive and mounts it at /shared. LS-Dyna is particularly latency sensistive so I’ve increased the storage throughput to the max, 1,000 MB/TB that FSx Lustre supports. |
| HeadNode | This sets up a c5a.2xlarge instance as the head node. It has 8 hyper-threaded cpus and 16 gigs of memory. This is ideal for small computational tasks such as post-processing and installing software. |
| ComputeNodes | This sets up a queue of hpc6a.48xlarge instances. These instances have 96 physical cores and 384 GB of memory. These instances are ideal for tightly coupled compute. Note these instances don’t start running until we submit a job. |
Step 2: Install LS-Dyna
Now we’re going to install LS-Dyna. Please ask Ansys/LSTC for the credentials to the FTP site, you’ll need these credentials to access the software. The version we’ve chosen is ls-dyna_mpp_s_R13_1_1_x64_centos78_ifort190_avx2_intelmpi-2018, which I’ve broken down the naming scheme below:
| Value | Description | |
|---|---|---|
| Version | 13.1.1 | Latest LS-Dyna version |
| Precision | s | Single precision, substitute ’d' for double precision. Note 90% of LS-Dyna is single precision. |
| MPI/Hybrid | MPP | MPP is the MPI version, hybrid (HYB) is OpenMP/MPI |
| Platform | x64 | x86_64 platform |
| OS | centos78 | Works with Centos 7 & 8, Amazon Linux 1 & 2 |
| Fortran version | ifort190 | Fortran version, doesn’t need to be installed. |
| Feature | avx2 | Intel’s Advanced Vector Instructions (AVX), AVX2 is used so it’ll work on the AMD based hpc6a.48xlarge instance. If using an intel instance, use AVX512. |
| MPI Version | intelmpi 2018 | Versions compatible with EFA include Open MPI 4.X.X or Intel MPI 2018.X |
You’re probably curious why we’ve chosen these defaults. These were chosen after benchmarking all the permutations:

-
Create a directory
/shared/ls-dyna/versionsin the shared folder to store the LS-Dyna binaries:# create a directory for the LS-Dyna versions: mkdir -p /shared/ls-dyna/versions && cd "$_" -
Create a script called
download.shwith the following contents. Input theUSERNAMEandPASSWORDfrom Ansys:#!/bin/bash # Usage: # ./download.sh https://ftp.lstc.com/user/mpp-dyna/... # # This downloads and extracts the LS-Dyna binary. if [ ! -n "$1" ]; then echo "Usage ./download.sh [ls-dyna-version-url]" fi USERNAME=#ask ansys/lstc for this PASSWORD=#ask ansys/lstc for this wget $1 --user $USER --password $PASSWORD bash $(basename $1) rm $(basename $1) -
Run the download script,
./download.sh [ls-dyna url]this will pop up with a license agreement, type ‘q’ to go to the bottom, then type ‘y’ to agree to the license and then ‘n’ to install in current directory/shared/ls-dyna/versions:./download.sh https://ftp.lstc.com/user/mpp-dyna/R13.1.1/x86-64/ifort_190_avx2/MPP/ls-dyna_mpp_s_R13_1_1_x64_centos78_ifort190_avx2_intelmpi-2018.tgz_extractor.sh ./download.sh https://ftp.lstc.com/user/mpp-dyna/R13.1.1/x86-64/ifort_190_avx2/MPP/ls-dyna_mpp_s_R13_1_1_x64_centos78_ifort190_avx2_intelmpi-2018_sharelib.tar.gz_extractor.sh -
You should now see two binaries:

Step 3: Setup LSTC License Server
Next we’re going to setup the LSTC license server on the head node, this allows the compute nodes to reach the license server and checkout licenses. If you’d like to use this license for more than one cluster, I reccomend you do this on a seperate instance.
See https://ftp.lstc.com/user/license/License-Manager/LSTC_LicenseManager-InstallationGuide.pdf for detailed setup instructions
-
Connect to the HeadNode via SSM (or SSH).
-
Next we’re going to download and run the LSTC license server:
cd /shared
mkdir lstc_server/ && cd lstc_server/
wget https://ftp.lstc.com/user/license/Job-License-Manager/LSTC_LicenseManager_111345_xeon64_redhat50.tgz --user $USERNAME --password $PASSWORD --no-check-certificate
tar -xzf LSTC_LicenseManager_111345_xeon64_redhat50.tgz
rm LSTC_LicenseManager_111345_xeon64_redhat50.tgz
- Now we’re going to generate the server info to send to Ansys/LSTC. Edit the top 4 lines, as well as the IP ranges:
[ec2-user@ip-10-0-0-30 lstc]$ ./lstc_server info
Getting server information ...

The hostid and other server information has been written to LSTC_SERVER_INFO.
Please contact LSTC with this information to obtain a valid network license
[ec2-user@ip-10-0-0-30 lstc]$ vim LSTC_SERVER_INFO
[Insert Company Name]
    EMAIL: email@example.com
      FAX: WHO-HAS-A-FAX
TELEPHONE: XXX-XXX-XXXX
...
ALLOW_RANGE:  10.000.000.000 10.000.255.255
- Email LSTC the
LSTC_SERVER_INFOfile, they’ll get back to you with aserver_datafile. Put this in the same directory then start the server:
# from cloud9, upload the server_data file
$ scp server_data ec2-user@10.0.0.30:~/lstc
$ pcluster ssh hpc-cluster
[ec2-user@ip-10-0-0-30 ~]$ cd lstc
[ec2-user@ip-10-0-0-30 lstc]$ ./lstc_server -l logfile.log
- Once the server is started, you can check the log to make sure it’s running:
[ec2-user@ip-10-0-0-30 lstc]$ less logfile.log
LSTC License server version XXXXXX started...
Using configuration file 'server_data'
- You can check the license by running:
[ec2-user@ip-10-0-0-30 lstc]$ ./lstc_qrun -s localhost -r
Using user specified server 0@localhost

LICENSE INFORMATION

PROGRAM          EXPIRATION CPUS  USED   FREE    MAX | QUEUE
---------------- ----------      ----- ------ ------ | -----
MPPDYNA          04/05/2021        384    216    600 |     0
MPPDYNA_971      04/05/2021          0    216    600 |     0
MPPDYNA_970      04/05/2021          0    216    600 |     0
MPPDYNA_960      04/05/2021          0    216    600 |     0
LS-DYNA          04/05/2021          0    216    600 |     0
LS-DYNA_971      04/05/2021          0    216    600 |     0
LS-DYNA_970      04/05/2021          0    216    600 |     0
LS-DYNA_960      04/05/2021          0    216    600 |     0
                   LICENSE GROUP   384    216    600 |     0
Step 4: Setup Slurm
- Create a file, we’ll call it
submit.shthat’ll be used for submitting jobs to Slurm.
#!/bin/bash
#SBATCH -p [queue]
#SBATCH -n [cores]

####### LICENSE ##########
export LSTC_LICENSE="network"
export LSTC_LICENSE_SERVER="31010@10.0.0.30"
####### LICENSE ##########

####### USER PARAMS #######
BINARY=/shared/ls-dyna/versions/ls-dyna_mpp_s_R12_0_0_x64_centos65_ifort180_avx512_openmpi4.0.0
INPUT_DIR=/shared/ls-dyna/car2car
INPUT_FILE=c2c.key
NCORES=${SLURM_NTASKS}
MPI=openmpi
####### USER PARAMS #######

###### JOB DIR SETUP ######
echo "created jobs/${SLURM_JOB_ID} to store job output.."
mkdir -p jobs/${SLURM_JOB_ID} && cd "$_"
ln -s $INPUT_DIR/* .
###########################

# load mpi and kick off mpirun
module load $MPI
LSTC_MEMORY=auto mpirun -np ${NCORES} ${BINARY} I=${INPUT_FILE} NCPU=${NCORES} >> output.log 2>&1
You’ll need to modify the following parameters:
| Parameter | Destination | Example |
|---|---|---|
| -n | Number of cores to run on. | -n 384 |
| -p | Compute partition to submit jobs too. | -p hpc |
| LSTC_LICENSE_SERVER | The port@ip address of the license server. | 31010@10.0.0.30 |
| BINARY | Full path to the LS-Dyna binary | /shared/.../ls-dyna_mpp_s_... |
| INPUT_FILE | Input file, typically this is a .key file. |
/shared/ls-dyna/car2car |
| INPUT_DIR | Directory to fetch the input files from | c2c.key |
| MPI | Openmpi or Intel MPI | openmpi |
We’ve set LSTC_MEMORY=auto, This allows LS-DYNA to use the initial memory values and then to dynamically allocate memory if it needs more memory. You can read more about memory settings here.
Step 5: Running LS-Dyna
Next we’ll submit the script with sbatch submit.sh:
$ sbatch submit.sh
Submitted batch job 1
You’ll then see the job go into CF state for 2 minutes, before going into running R state:
$ squeue
             JOBID PARTITION     NAME     USER ST       TIME  NODES NODELIST(REASON)
                 1    queue0 submit.s ec2-user CF       0:01      4 queue0-dy-queue0-hpc6a48xlarge-[1-4]
$ watch squeue
Once the job is running we can ssh into one of the compute nodes like so:
$ ssh queue0-dy-queue0-hpc6a48xlarge-1
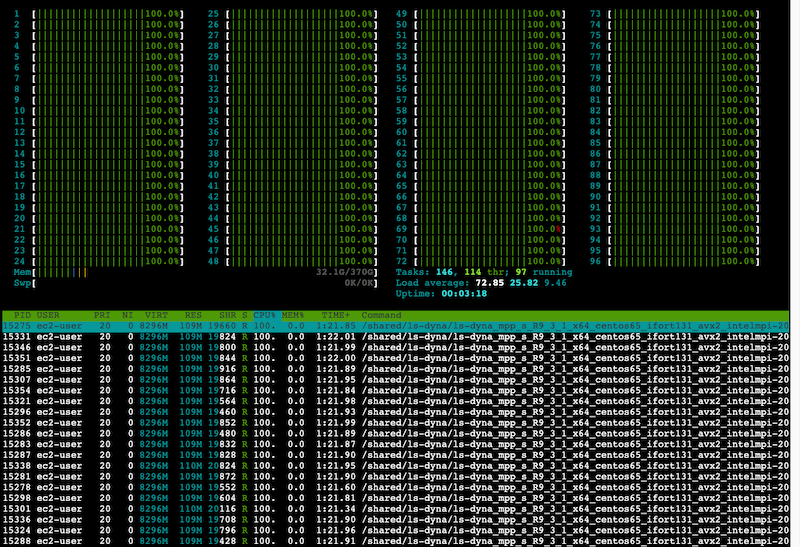
Once there, install and run htop to monitor CPU and memory utilization:
$ sudo yum install -y htop && htop
Appendix
AWS ParallelCluster Config file
HeadNode:
  InstanceType: c6a.2xlarge
  Ssh:
    KeyName: keypair
  Networking:
    SubnetId: subnet-12345678
  LocalStorage:
    RootVolume:
      VolumeType: gp3
  Iam:
    AdditionalIamPolicies:
      - Policy: arn:aws:iam::aws:policy/AmazonSSMManagedInstanceCore
  Dcv:
    Enabled: true
Scheduling:
  Scheduler: slurm
  SlurmQueues:
    - Name: hpc
      ComputeResources:
        - Name: hpc-hpc6a48xlarge
          MinCount: 0
          MaxCount: 64
          InstanceType: hpc6a.48xlarge
          Efa:
            Enabled: true
      Networking:
        SubnetIds:
          - subnet-12345678
        PlacementGroup:
          Enabled: true
      ComputeSettings:
        LocalStorage:
          RootVolume:
            VolumeType: gp3
  SlurmSettings:
    EnableMemoryBasedScheduling: true
Region: us-east-2
Image:
  Os: alinux2
SharedStorage:
  - Name: FsxLustre0
    StorageType: FsxLustre
    MountDir: /shared
    FsxLustreSettings:
      StorageCapacity: 1200
      DeploymentType: PERSISTENT_2
      DataCompressionType: LZ4
      PerUnitStorageThroughput: 500