Multi-User AWS ParallelCluster
See #170
This approach is a fairly lightweight way of adding users, it gives all users the same permissions. If you want a more robust multi-user approach I suggest you setup AD authentication.
In order to create a user for the cluster, that user needs to exist on all the compute nodes. If they don’t Slurm won’t be able to schedule jobs and you won’t be able to run mpi jobs across multiple nodes.
Create user on the head node & generate a new ssh keypair by running the following commands:
sudo su
USER=<your desired username>
useradd $USER
su $USER
cd ~
ssh-keygen -t rsa -f ~/.ssh/id_rsa -q -P ""
cat ~/.ssh/id_rsa.pub > ~/.ssh/authorized_keys
chmod 600 ~/.ssh/*
Create a file in the shared directory /opt/parallelcluster/shared/ with the user’s username and UID like so:
sudo su
echo "$USER,`id -u $USER`" >> /opt/parallelcluster/shared/userlistfile
Cat out the file to confirm the username and UID are correct:
$ cat /opt/parallelcluster/shared/userlistfile
swsmith,1002
Create a script create-users.sh that contains:
#!/bin/bash

. "/etc/parallelcluster/cfnconfig"

IFS=","

if [ "${cfn_node_type}" = "ComputeFleet" ]; then
    while read USERNAME USERID
    do
        # -M do not create home since head node is exporting /homes via NFS
        # -u to set UID to match what is set on the head node
        if ! [ $(id -u $USERNAME 2>/dev/null || echo -1) -ge 0 ]; then
            useradd -M -u $USERID $USERNAME
        fi
    done < "/opt/parallelcluster/shared/userlistfile"
fi
Upload it to S3
$ aws s3 cp create-users.sh s3://[your_bucket]/
In the next sections I give examples that use Pcluster Manager or the AWS ParallelCluster CLI. You only need to follow one path. I reccomend Pcluster Manager for most users.
Pcluster Manager
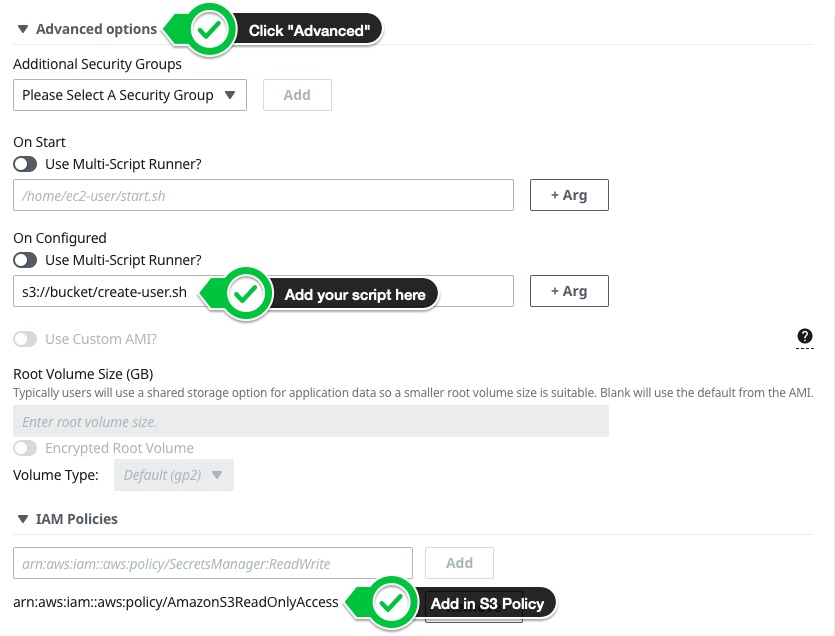
To add this in Pcluster manager:
- Edit the cluster > skip to Queues section
- Click on Advanced options
- Paste in
s3://[bucket]/create-users.shin the On Configured Section - Expand IAM Policies > add
arn:aws:iam::aws:policy/AmazonS3ReadOnlyAccessand click Add
Stop and update the running cluster.
ParallelCluster 3.X CLI (optional)
CustomActions:
    OnNodeConfigured:
        Script: s3://[your_bucket]/create-users.sh
Iam:
    S3Access:
        - BucketName: [your_bucket]
Pcluster Manager
Once you’ve updated the Queue, proceed to Review screen:
- Click Stop Compute Fleet
- Dry Run to see if the update will work. You may see the warning
UrlValidator: The S3 object 's3://bucket/create-users.sh' does not exist or you do not have access to it.. You can safely ignore this. - Update to perform the update
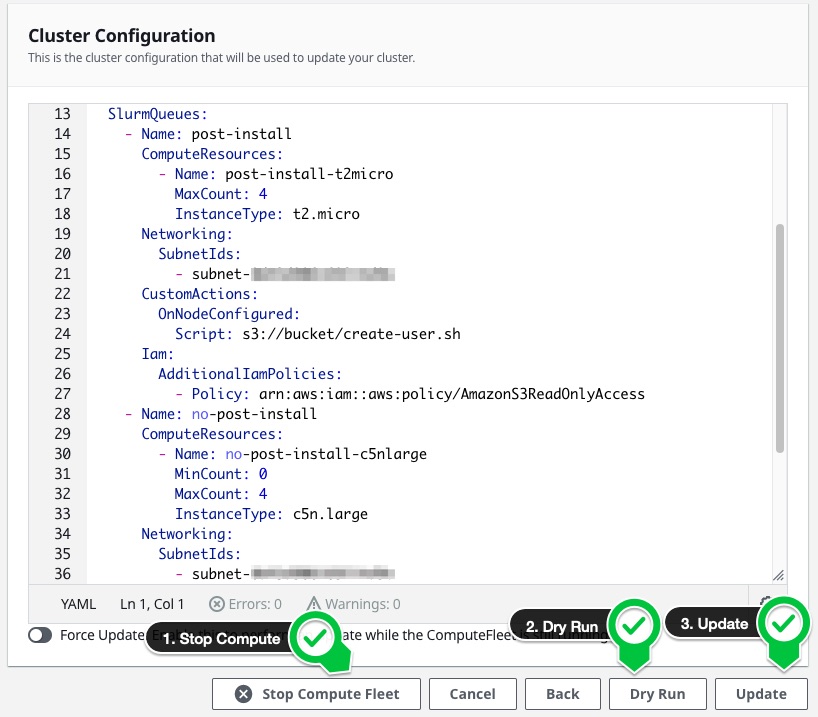
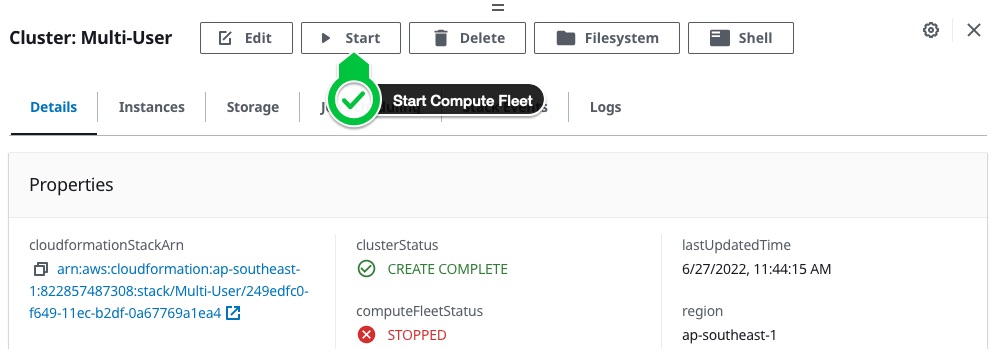
After the update has completed make sure to start the compute fleet:
ParallelCluster 3.X CLI (optional)
CLUSTER_NAME=<name of your cluster>
pcluster update-compute-fleet --cluster-name $CLUSTER_NAME --status STOP_REQUESTED
# no need to wait
pcluster update-cluster --cluster-name $CLUSTER_NAME --cluster-configuration /path/to/config.yaml
pcluster update-compute-fleet --cluster-name $CLUSTER_NAME --status START_REQUESTED
Connect as User
Now that we’ve gotten the scripts configured, we can add user’s SSH keys and authenticate into the cluster:
- Add the user’s public key to their
~/.ssh/authorized_keysfile.
$ sudo su - swsmith
$ echo "ssh-rsa AAAAB3NzaC1yc2EAAAADAQABAAABAQCor5v/edo4HYBtZ8OattO2H12o2kO2tRVDeHc5Odq7L6KUYy1hiZRJYD9wVNvwra656CtCQXaK3whD3NpRaVTg6/NccBvyYPNXw7XyZswC0LsQnn9JMxOi9twKA1iBHj44UupEZFw0MqBBIjg7Xn4pqTMrMcwpoFjWGfAPM4F22FIgMypMs3LCBJ37G0hfVvSlnFp1iV/VA9O5B+CGEWxBLX06QIjpO3nzTjToHlRYWVgqJ7086V3wbPkbaJi/FrXH0TJkZ/FC2rK7B7J0mEcImwv/ZQBIPs46rYaFyxA0F1VDLN+D73AHNJukz6wXtIj1iYbXEpqRH0j8fYLSl6i7" >> ~/.ssh/authorized_keys
- Login as that user
➜  ssh -i ~/.ssh/keypair swsmith@13.215.158.213
Last login: Mon Jun 27 19:06:51 2022 from 54-240-199-100.amazon.com

       __|  __|_  )
       _|  (     /   Amazon Linux 2 AMI
      ___|\___|___|

https://aws.amazon.com/amazon-linux-2/
[swsmith@ip-10-0-122-74 ~]$ squeue
             JOBID PARTITION     NAME     USER ST       TIME  NODES NODELIST(REASON)
                 2 no-post-i interact ec2-user  R       9:56      1 no-post-install-dy-no-post-install-c5nlarge-1
[swsmith@ip-10-0-122-74 ~]$ scancel 2
scancel: error: Kill job error on job id 2: Access/permission denied
[swsmith@ip-10-0-122-74 ~]$ salloc -N 1
salloc: Granted job allocation 5
[swsmith@ip-10-0-122-74 ~]$ squeue
             JOBID PARTITION     NAME     USER ST       TIME  NODES NODELIST(REASON)
                 5 post-inst interact  swsmith  R       0:03      1 post-install-dy-post-install-t2micro-1
[swsmith@ip-10-0-122-74 ~]$ ssh post-install-dy-post-install-t2micro-1
Warning: Permanently added 'post-install-dy-post-install-t2micro-1,10.1.98.68' (ECDSA) to the list of known hosts.
Last login: Mon Jun 27 19:00:54 2022 from ip-10-0-122-74.ap-southeast-1.compute.internal

       __|  __|_  )
       _|  (     /   Amazon Linux 2 AMI
      ___|\___|___|

https://aws.amazon.com/amazon-linux-2/
[swsmith@post-install-dy-post-install-t2micro-1 ~]$ whoami
swsmith
[swsmith@post-install-dy-post-install-t2micro-1 ~]$ pwd
/home/swsmith
In the above example, I authenticated as user swsmith, logged into the cluster, tried to cancel another’s user’s job, got a permission denied. Then I submitted my own job (salloc -N 1), got it and authenticated to the compute node as my user. I saw that the home directory and ssh keys are automatically synced across the cluster.
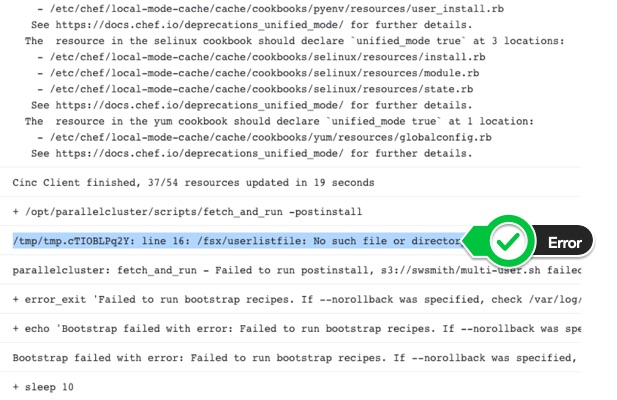
Troubleshooting
If the instances fail to come up, we can check the /var/log/cloud-init-output.log log on the compute node to see what the issue is.
- In pcluster manager, Logs tab > Pick a compute node and select cloud-init-output log:
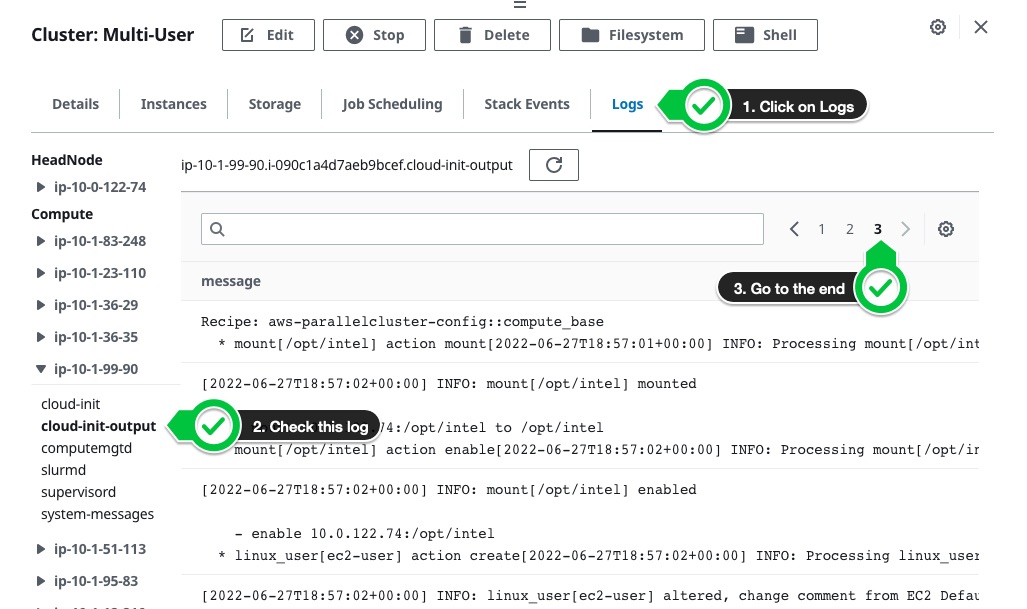
- Skip to the last page of the log to find the error