Setup S3 Mountpoint with AWS ParallelCluster 🗂
tl;dr:
Mount an S3 Bucket like a shared filesystem
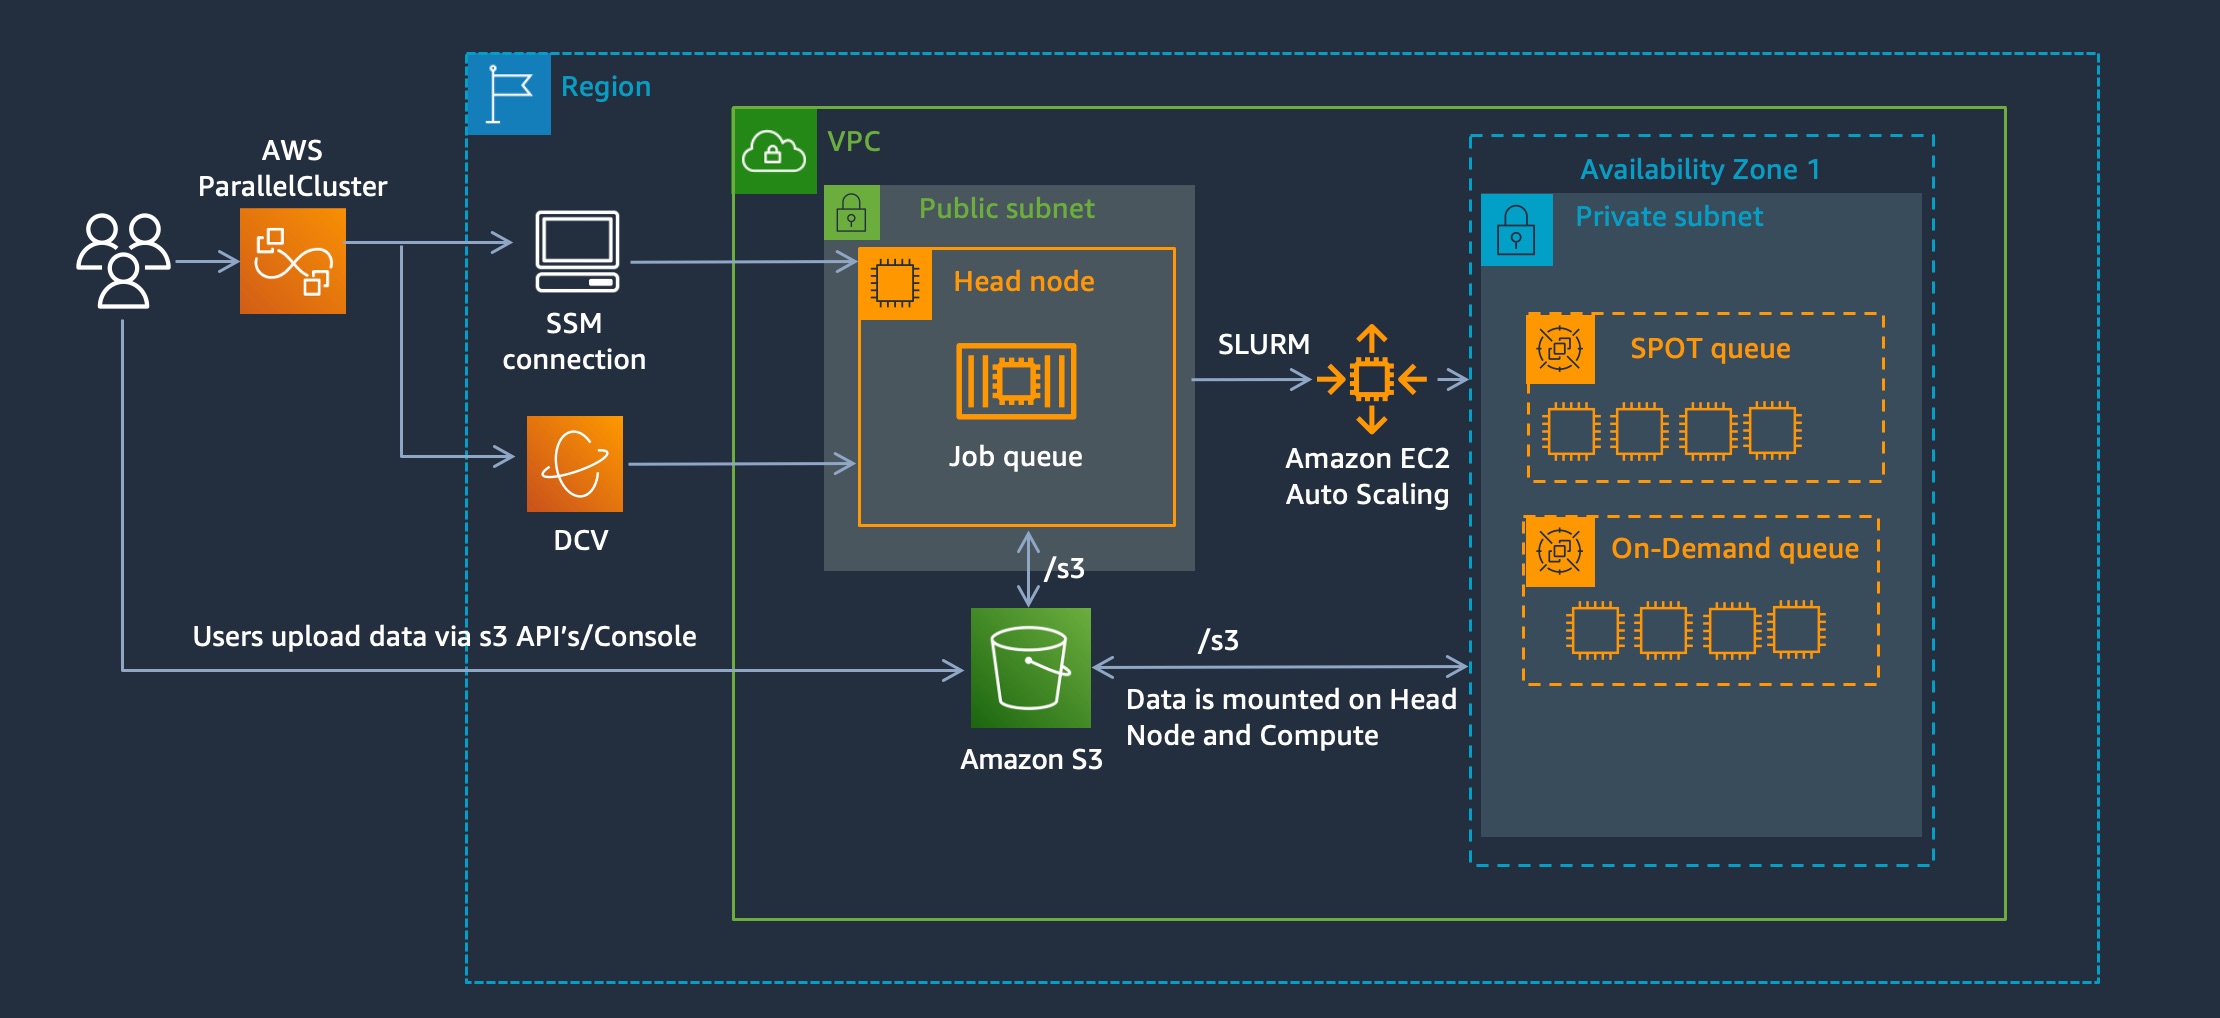
S3 Mountpoint is a new solution that provides a way to mount an S3 bucket as if it’s a shared filesystem. This gives several advantages:
- Allows using applications that don’t support S3 API’s
- Easy interface for users to browse files in S3
So what are the downsides?
Read-only in alphaGA version released March 2023- Non-POSIX compliant. This means operations such as metadata changes, file-locking ect. are not supported.
Setup
-
In this guide, I’ll assume you already have AWS ParallelCluster UI setup, if you don’t follow the instructions on pcluster.cloud to get started.
-
I’ve created a post-install script called s3-mountpoint.sh that installs S3 mountpoint and mounts an S3 bucket. You call it like so:
#!/bin/bash # Usage: # ./s3-mountpoint.sh /shared mybucket source /etc/parallelcluster/cfnconfig # Install S3 Mountpoint if it's not installed if [ ! -x "$(which mount-s3)" ]; then sudo yum install -y fuse fuse-devel cmake3 clang-devel curl --proto '=https' --tlsv1.2 -sSf https://sh.rustup.rs | sh -s -- -y && source "$HOME/.cargo/env" git clone --recurse-submodules https://github.com/awslabs/mountpoint-s3.git cd mountpoint-s3/ cargo build --release mv target/release/mount-s3 /usr/bin/ fi # get network throughput from ec2 instance token=$(curl -sX PUT "http://169.254.169.254/latest/api/token" -H "X-aws-ec2-metadata-token-ttl-seconds: 21600") instance_type=$(curl -sH "X-aws-ec2-metadata-token: $token" http://169.254.169.254/latest/meta-data/instance-type) region=$(curl -sH "X-aws-ec2-metadata-token: $token" http://169.254.169.254/latest/dynamic/instance-identity/document | grep region|awk -F\" '{print $4}') network=$(aws ec2 --region ${region} describe-instance-types --instance-types ${instance_type} --query "InstanceTypes[].[NetworkInfo.NetworkPerformance]" --output text | grep -o '[0-9]\+' | head -n 1) # Mount S3 Bucket mkdir -p ${1} echo "Network Performance: [${network}]" chown $cfn_cluster_user:$cfn_cluster_user ${1} mount-s3 --maximum-throughput-gbps ${network} ${2} ${1} -
Setup a cluster with the following s3-mountpoint.yaml config file:
HeadNode:
  InstanceType: c5.xlarge
  Networking:
    SubnetId: subnet-12345
  Ssh:
    KeyName: keypair
  LocalStorage:
    RootVolume:
      VolumeType: gp3
  Iam:
    AdditionalIamPolicies:
      - Policy: arn:aws:iam::aws:policy/AmazonSSMManagedInstanceCore
      - Policy: arn:aws:iam::aws:policy/AmazonEC2ReadOnlyAccess
    S3Access:
      - BucketName: mybucket
        EnableWriteAccess: true
  CustomActions:
    OnNodeConfigured:
      Script: https://swsmith.cc/scripts/s3-mountpoint.sh
      Args:
        - /shared
        - mybucket
Scheduling:
  Scheduler: slurm
  SlurmQueues:
    - Name: queue0
      AllocationStrategy: lowest-price
      ComputeResources:
        - Name: queue0-compute-resource-0
          Instances:
            - InstanceType: c5n.large
          MinCount: 0
          MaxCount: 4
      Networking:
        SubnetIds:
          - subnet-8b15a7c6
      ComputeSettings:
        LocalStorage:
          RootVolume:
            VolumeType: gp3
      Iam:
        S3Access:
            - BucketName: mybucket
              EnableWriteAccess: true
        AdditionalIamPolicies:
            - Policy: arn:aws:iam::aws:policy/AmazonEC2ReadOnlyAccess
      CustomActions:
        OnNodeConfigured:
          Script: https://swsmith.cc/scripts/s3-mountpoint.sh
          Args:
            - /shared
            - mybucket
  SlurmSettings: {}
Region: us-east-2
Image:
  Os: alinux2
Test
-
Once the cluster goes into CREATE_COMPLETE, connect to the Head Node and list out the files:
$ sudo ls -la /mybucket total 120056511 drwxr-xr-x 2 root root 0 Mar 24 13:15 . dr-xr-xr-x 24 root root 4096 Mar 24 13:05 .. -rw-r--r-- 1 root root 6596329472 Oct 29 2020 ANSYS2019R3_LINX64_Disk2.iso drwxr-xr-x 2 root root 0 Mar 24 13:15 ansys-installer drwxr-xr-x 2 root root 0 Mar 24 13:15 api -rw-r--r-- 1 root root 651 Apr 22 2022 budget.json -rw-r--r-- 1 root root 4515 Jul 16 2021 c2c.inp -rw-r--r-- 1 root root 2132 Dec 9 2020 calculate_nodes.py drwxr-xr-x 2 root root 0 Mar 24 13:15 car2car -
You’ll notice the files are owned by
root, this is because the post-install script is run as root
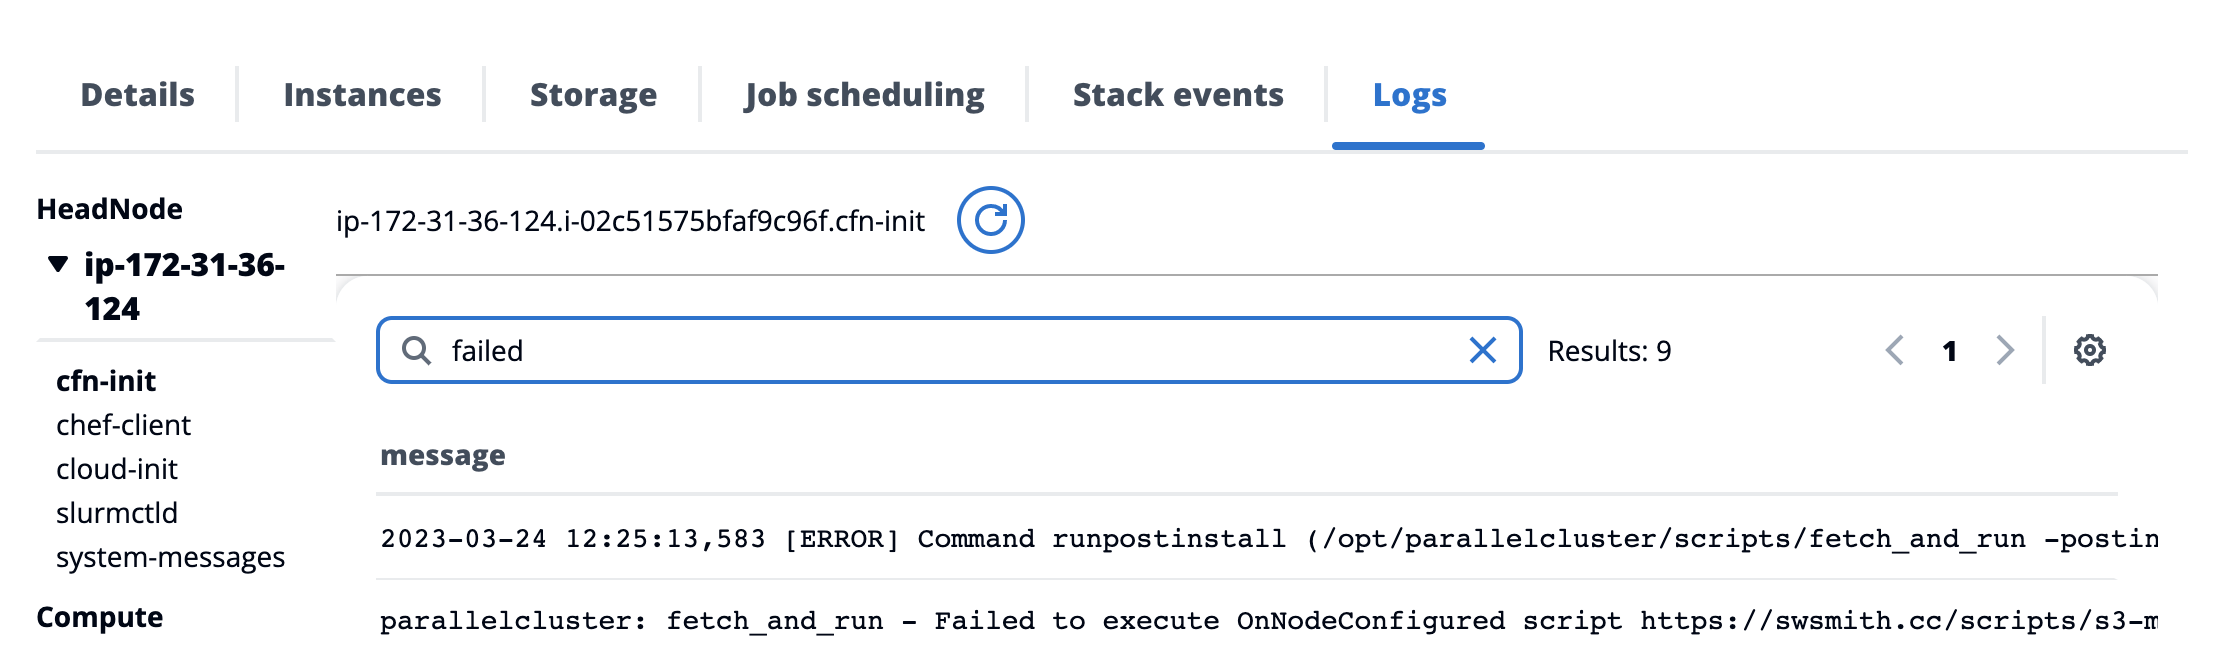
Debug
- If the cluster goes into CREATE_FAILED fear not - the logs are all preserved and you can easily debug the source of the failure by looking at the
cfn-initlogfile: