Slurm Accounting with AWS ParallelCluster 📊

In this tutorial we will work through setting up Slurm Accounting. This enables many features within slurm, including job resource tracking and providing a necessary building block to slurm federation.
Step 1 - Setup External Accounting Database
The first requirement is to setup an external database that Slurm can use to store the accounting data.
Use the following CloudFormation Quick-Create link to create the database in your AWS account.
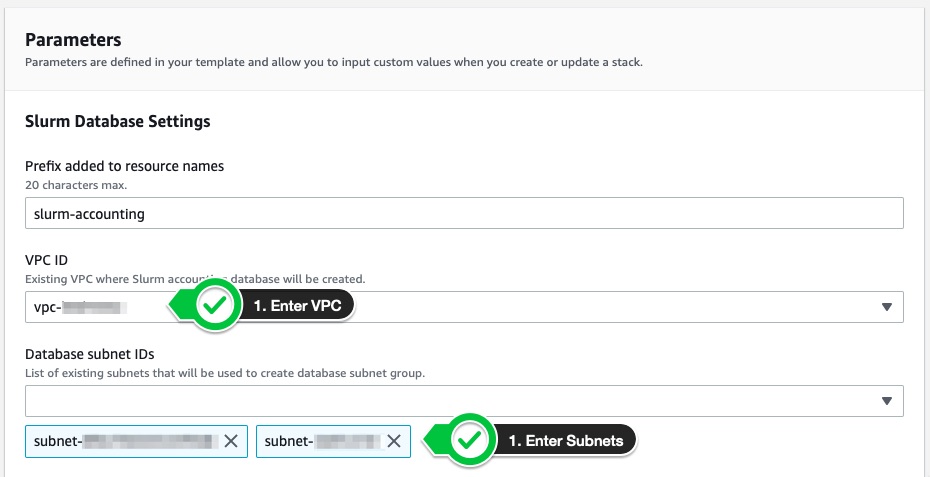
When you’re creating the stack, be sure to specify the VPC ID and Subnets parameters to correspond to the VPC where you are creating the stack. All other values should be suitable as defaults, however feel free to change the database instance type depending on your workload needs.
Note
Change the region in the URL to create the stack in a region separate from
us-east-1.
Step 2- Retrieve the outputs from the CloudFormation stack
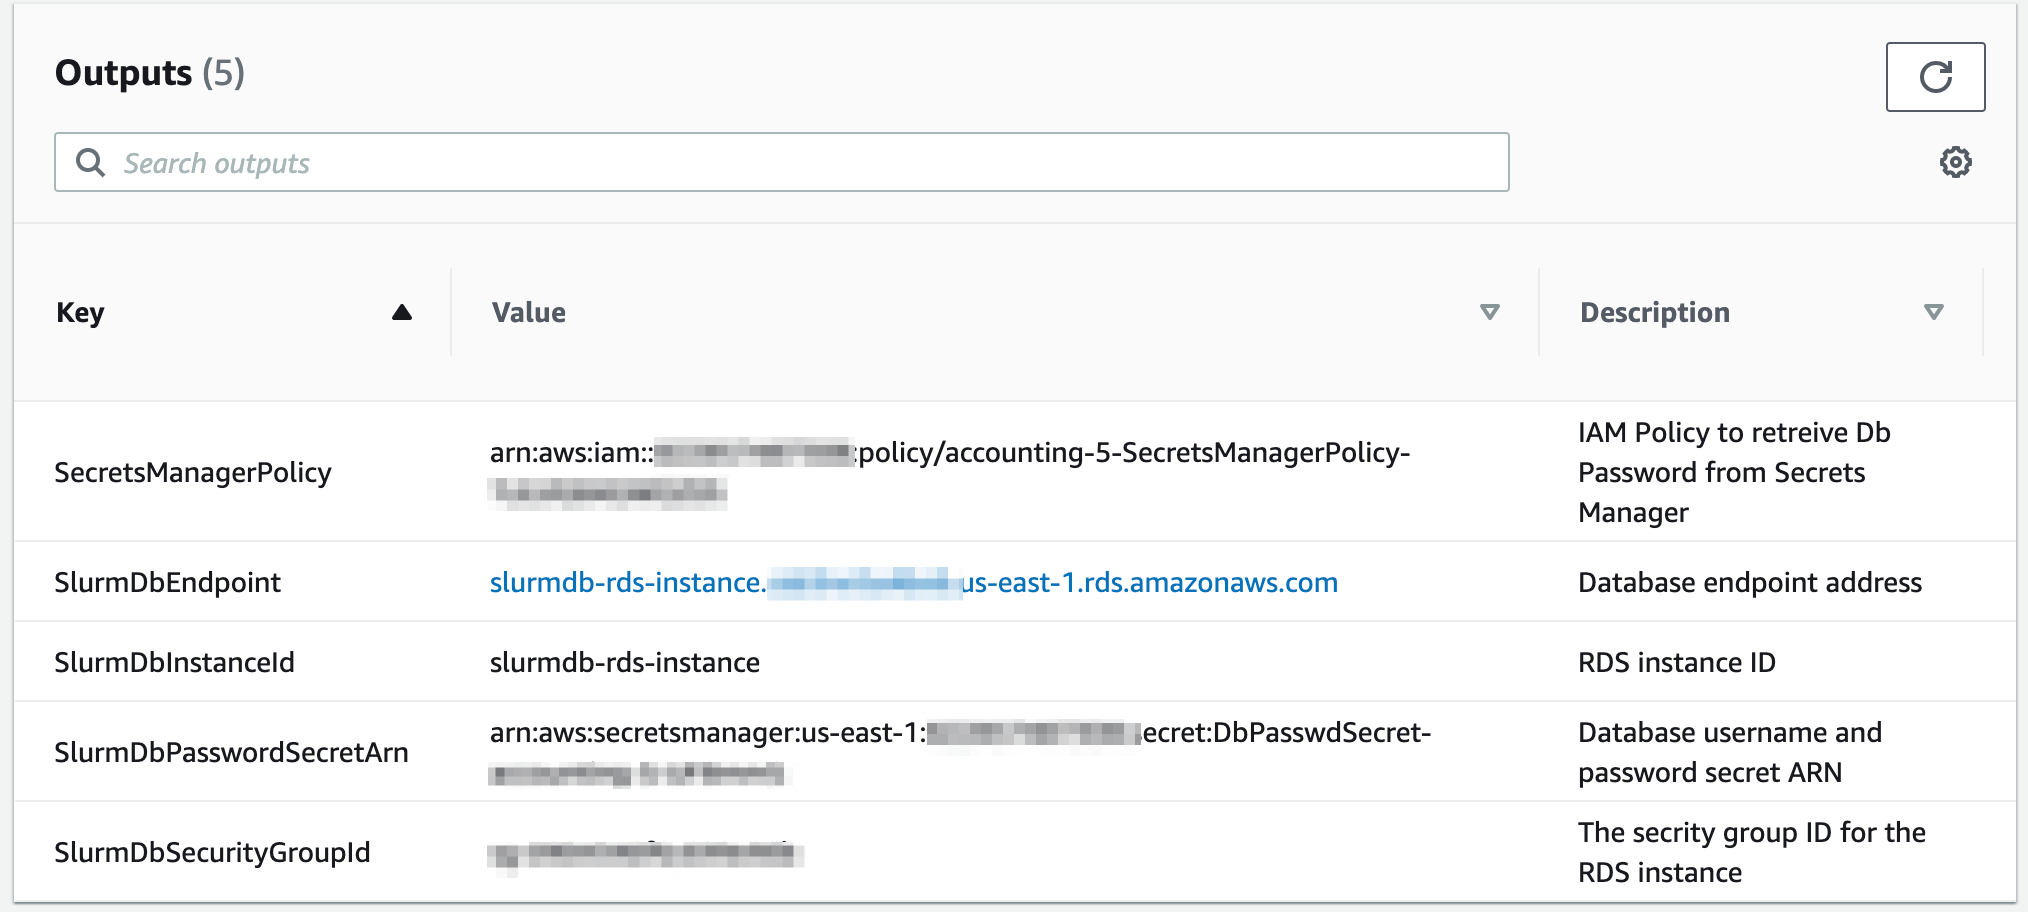
Once the stack has reached a Completed state. You will need to go to the Outputs tab of the stack and make note of the properties as they will be used in the creation of your cluster.
Step 3 - Add permissions to your lambda
In order to allow our cluster access to secrets we need to add an additional IAM policy.
- Go to the Lambda Console (deeplink) and search for
PclusterManagerFunction - Select the function then
Configuration>Permissions> Click on the role underRole name. - Select
Add permissions>Attach policies> search forSecretsManagerPolicy - Click
Attach policies

Step 4 - Create Your Cluster
Next, go to Pcluster Manager and choose the Create option to create a new cluster.
- Select Wizard option and click next
Cluster Properties
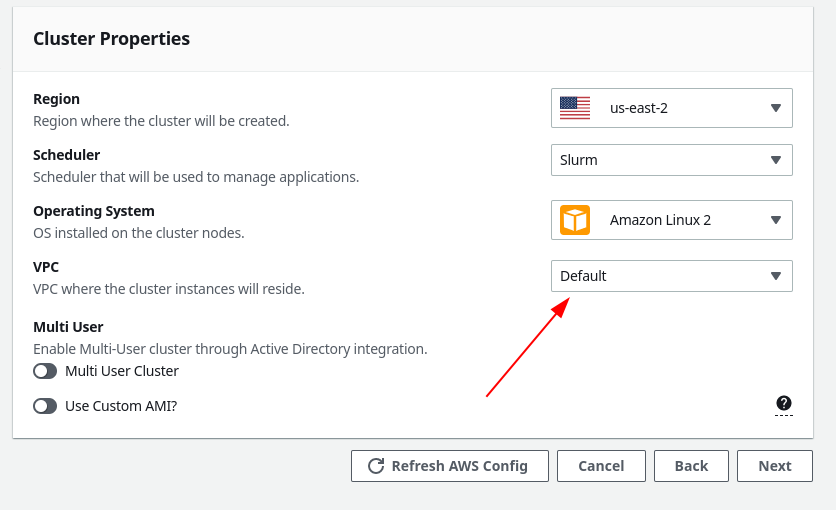
Choose a suitable name for your cluster, and then in the Cluster Properties window, be sure to choose the VPC that you used when creating the slurm-accounting CloudFormation stack.
HeadNode Properties
You will need to enable the Virtual Console option as that allows Pcluster Manager to interact with the cluster directly:
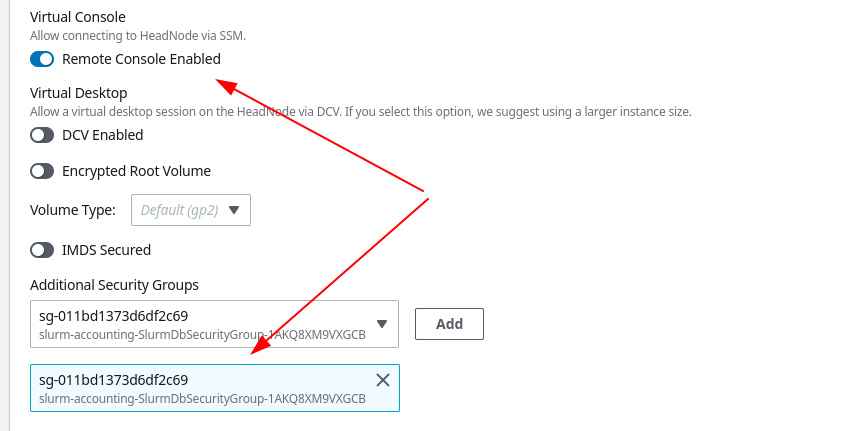
Be sure to also enable the Security Group referenced in the CloudFormation outputs so that the HeadNode can access the database.
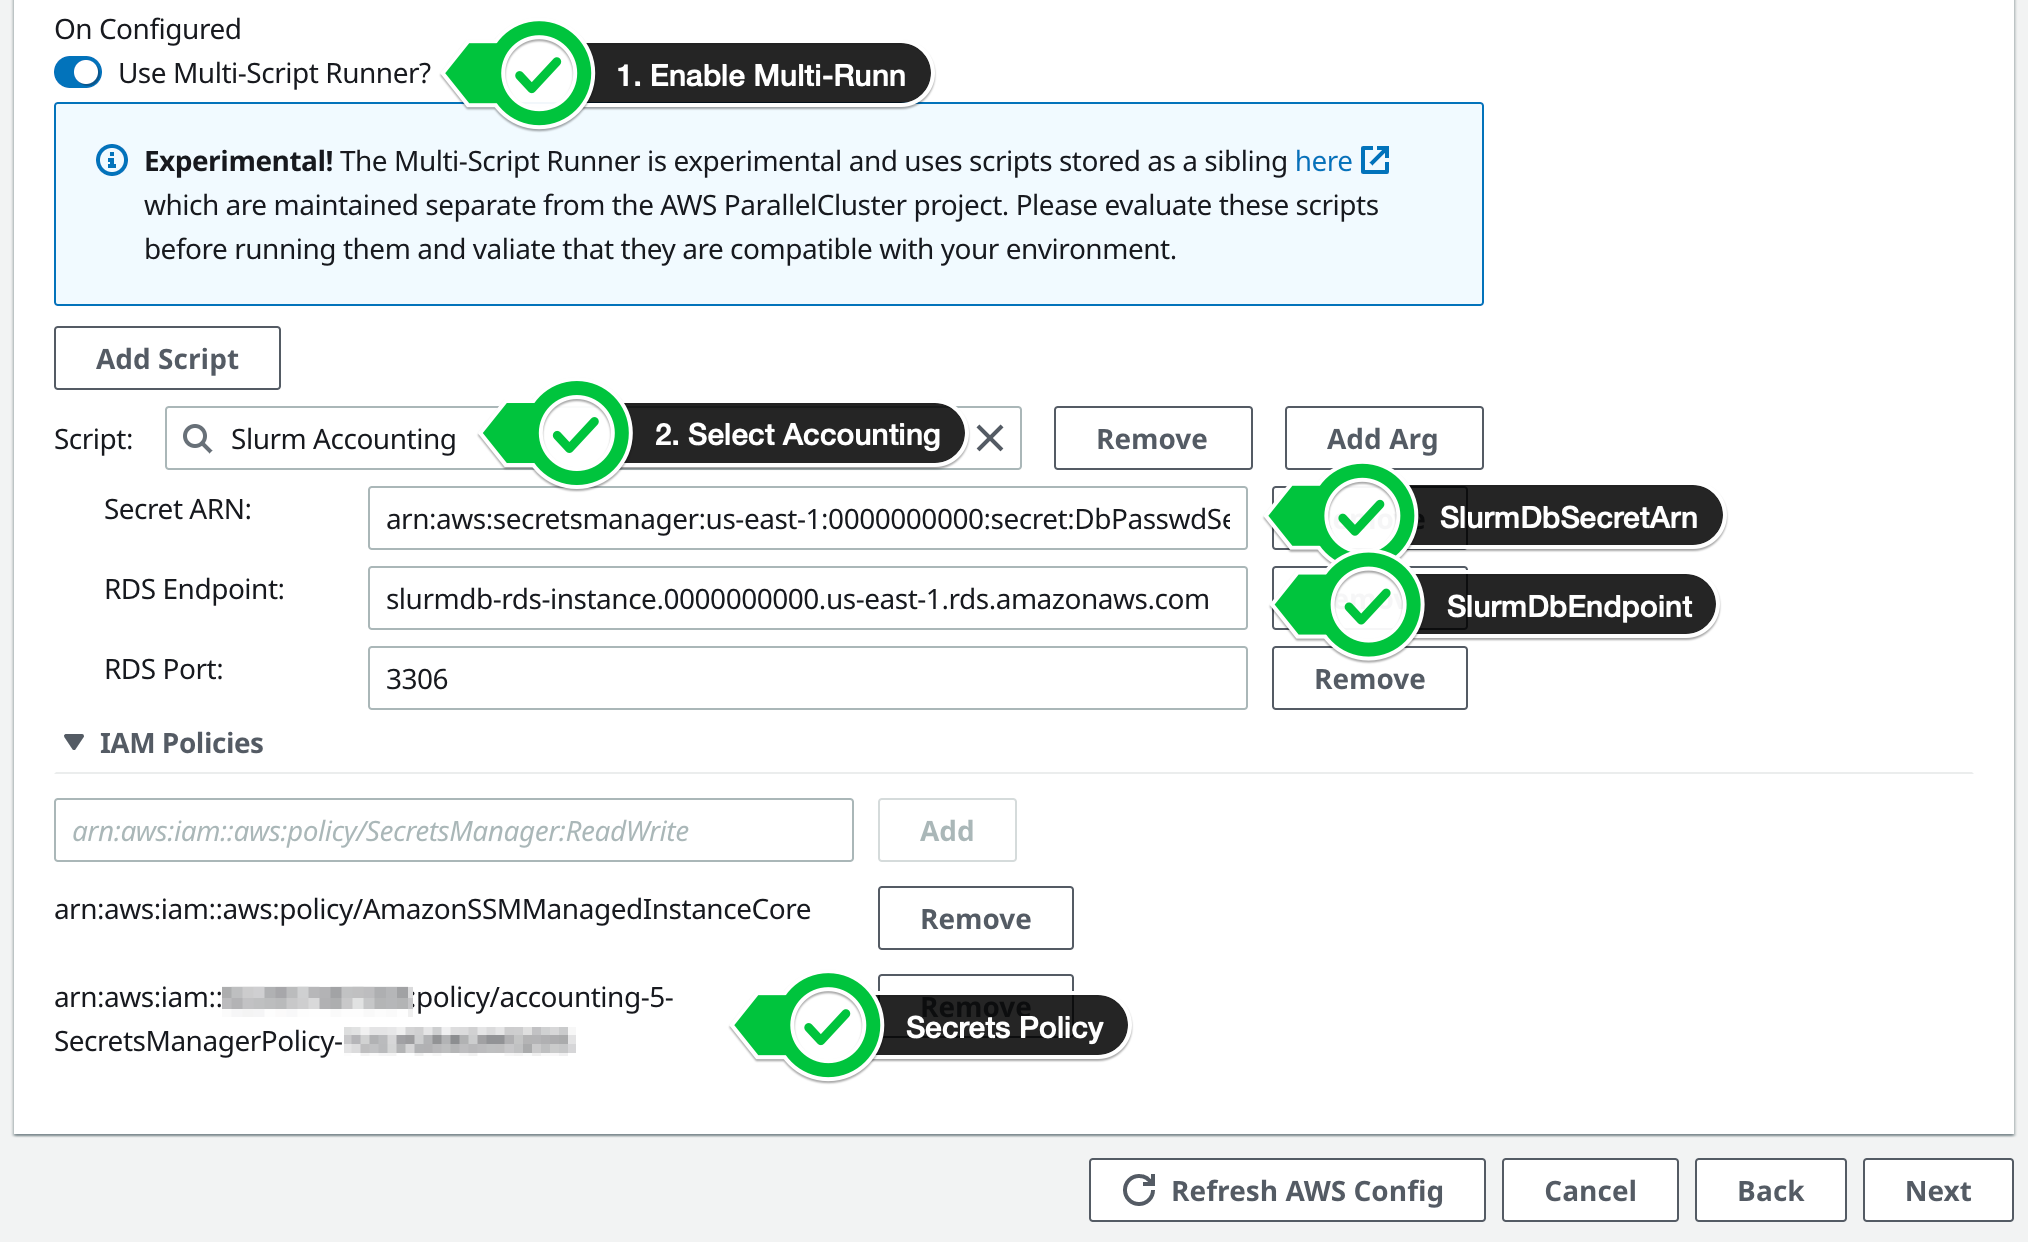
Next we’ll enable a known script that will install slurm accounting on the HeadNode.
- Choose the advanced options
- Under the
On Configuredoption, Choose theMulti-Script Runnerwhich has some pre-programmed scripts in it - In the search box choose
Slurm Accounting - Fill in the values for the
Secret ARNandRDS Endpointfrom the CloudFormation output - Under
IAM Policiesadd the arn from the CloudFormation Stack outputSecretsManagerPolicyso that the HeadNode can access the password to the database. Be sure to actually clickAddso that it is added to the list.
Review Config
After you’ve configured the HeadNode, Filesystem and Queues, you’ll be asked to review the config. The following parameters must be set:
| Parameter | Description |
|---|---|
| AdditionalSecurityGroups | SlurmDbSecurityGroupId (CloudFormation) |
| AdditionalIamPolicies | AmazonSSMManagedInstanceCore, SecretsManagerPolicy (CloudFormation) |
| CustomActions/OnNodeConfigured | multi-runner.py |
| Arg 0: Accounting Script | slurm-accounting.py |
| Arg 1: SECRET_ARN | SlurmDbPasswordSecretArn (CloudFormation) |
| Arg 2: RDS Endpoint | SlurmDbEndpoint (CloudFormation) |
| Arg 3: Port | Default is 3306 |
Here’s an example config file to reference, take a look a the comments to see what’s required:
HeadNode:
  InstanceType: t2.micro
  Networking:
    SubnetId: subnet-12345678910
    AdditionalSecurityGroups:
      - sg-12345678910  # Security Group `SlurmDbSecurityGroup`
  Iam:
    AdditionalIamPolicies:
      - Policy: arn:aws:iam::aws:policy/AmazonSSMManagedInstanceCore
      - Policy: arn:aws:iam::12345678910:policy/accounting-SecretsManagerPolicy-1ULXG84GWOZ05 # Policy `SecretsManagerPolicy`
  CustomActions:
    OnNodeConfigured:
      Script: >-
        https://raw.githubusercontent.com/aws-samples/pcluster-manager/main/resources/scripts/multi-runner.py
      Args:
        - >-
          https://raw.githubusercontent.com/aws-samples/pcluster-manager/main/resources/scripts/slurm-accounting.sh
        - '-arn:aws:secretsmanager:us-east-2:1234567890:secret:DbPasswdSecret' # `SlurmDbPasswordSecretArn`
        - '-slurmdb-rds-instance.c123456.us-east-2.rds.amazonaws.com' # RDS Endpoint `SlurmDbEndpoint`
        - '-3306' # Default Port 3306
Scheduling:
  Scheduler: slurm
  SlurmQueues:
    - Name: queue0
      ComputeResources:
        - Name: queue0-t2-micro
          MinCount: 0
          MaxCount: 4
          InstanceType: t2.micro
      Networking:
        SubnetIds:
          - subnet-12345678910
Region: us-east-2
Image:
  Os: alinux2
Step 5 - Submit a job
Once the cluster has been successfully created, go to the Scheduling tab and select Submit Job

Choose a name for your job, a number of nodes to run under, choose to Run a command and provide a simple sleep 30 command.

Step 5 - View the Accounting Tab
Once you’ve submitted a job, you can see the job information under the Accounting tab
You can use any of the filters at the top to narrow down the number of jobs in the view to select specific jobs.

If you choose the Job ID in the left column you can see further detials about the job.

