Slurm Multi-Cluster Mode 📡
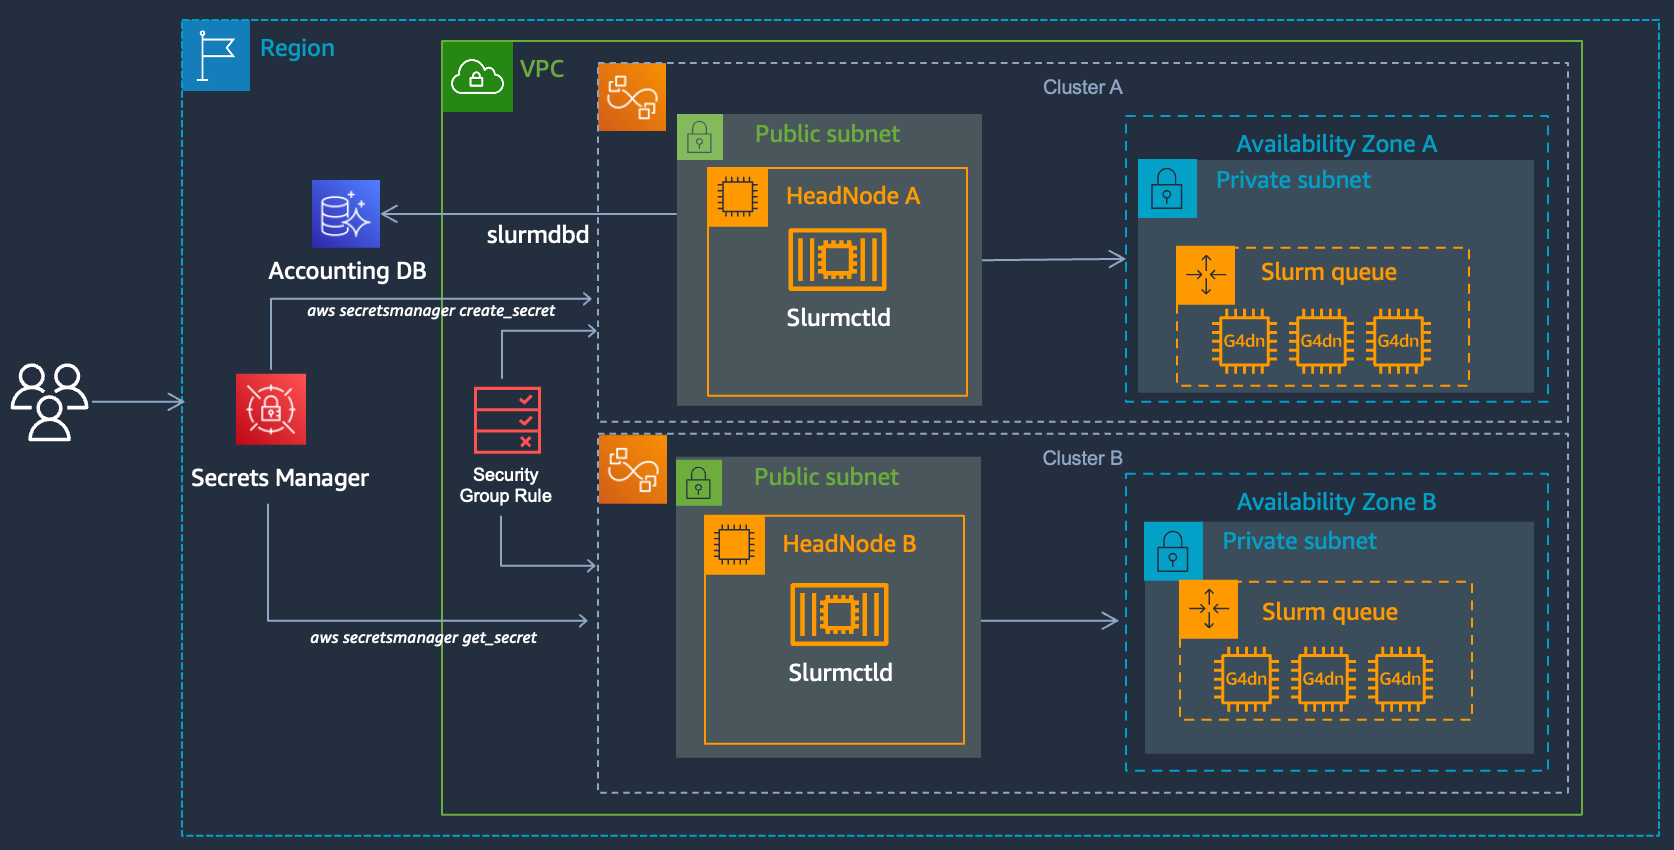
Slurm supports a feature called multi-cluster mode this allows you to submit jobs across multiple clusters, for example you could have one cluster on-prem, another in the cloud, or you could have clusters in two different regions, or you could have an x86 cluster and an aarch64 one. These are all scenarios where it might make sense to have two separate clusters, both running an independent slurmctld processes but which allow users to submit between the different clusters.
To submit to another cluster (once you set this up), simply specify the cluster name in your job submit:
sbatch --cluster Cluster-B ...
To set this up you’ll need to create two clusters, each with network connectivity, i.e. in the same vpc or using vpc peering, and then follow the instructions below:
1. Add SecretsManager Permissions
Update your cluster and include the arn:aws:iam::aws:policy/SecretsManagerReadWrite policy. This is used to synchronize the munge key which allows Slurm to communicate between each cluster.
      Iam:
        AdditionalIamPolicies:
          - Policy: arn:aws:iam::aws:policy/SecretsManagerReadWrite
2. Setup Slurm Accounting
- Setup both clusters with Slurm Accounting configured. Make sure to use the same database for both.
3. Configure security group rules
Both clusters will network connectivity to each other, in order to achieve this we’ll add a rule to the HeadNode Security Group of each cluster with the security group of the other cluster as the source.
-
Navigate to the HeadNode Security Group for Cluster A
-
Modify the ingress rules and add a rule like:
| Type | Protocol | Port Range | Source | Security Group | Description |
|---|---|---|---|---|---|
| All Traffic | All | All | Custom | Cluster-B HeadNode Security Group | Slurm Multi-Cluster |
-
Navigate to the HeadNode Security Group for Cluster B
-
Modify the ingress rules and add a rule like:
| Type | Protocol | Port Range | Source | Security Group | Description |
|---|---|---|---|---|---|
| All Traffic | All | All | Custom | Cluster-A HeadNode Security Group | Slurm Multi-Cluster |
4. Sync munge keys
To authenticate the slurm controller slurmctld between the clusters, we’ll need to use the same munge key on both clusters. In order to achieve this we’ll move the key from Cluster A to Cluster B and restart munge, slurmctld and slurmdbd on Cluster B. First grab the ip addresses for each HeadNode and record them:
| Name | ip address |
|---|---|
| Cluster A | 1.2.3.4 |
| Cluster B | 5.6.7.8 |
-
SSH into Cluster A and create a python file
upload_munge_key.pyto upload the file to Secrets Manager. We’ll then download this key on Cluster B.#!/usr/bin/python3 import boto3 client = boto3.client('secretsmanager', region_name='us-east-2') with open('/etc/munge/munge.key', 'rb') as file: munge_key = file.read() response = client.create_secret( Name='MungeKey', SecretBinary=munge_key ) print(response)Now run this python script to upload the munge key to secrets manager:
sudo su
pip3 install boto3
python3 upload_munge_key.py
You’ll get an output like, from this copy the
ARN:{'ARN': 'arn:aws:secretsmanager:us-east-2:822857487308:secret:MungeKey-yYkLFE', 'Name': 'MungeKey', 'VersionId': '40148885-0eb0-41ec-bb07-09597a21a5f7', 'ResponseMetadata': {'RequestId': 'ad875df2-36bb-4420-8da6-e6337a130ea0', 'HTTPStatusCode': 200, 'HTTPHeaders': {'x-amzn-requestid': 'ad875df2-36bb-4420-8da6-e6337a130ea0', 'content-type': 'application/x-amz-json-1.1', 'content-length': '147', 'date': 'Mon, 31 Jul 2023 20:34:34 GMT'}, 'RetryAttempts': 0}} -
Next SSH into Cluster B and create a script
download_munge_key.py#!/usr/bin/python import os import sys import boto3 client = boto3.client('secretsmanager', region_name='us-east-2') print("Baking up /etc/munge/munge.key to /etc/munge/munge_backup.key") os.rename("/etc/munge/munge.key", "/etc/munge/munge_backup.key") with open('/etc/munge/munge.key', 'wb') as file: response = client.get_secret_value( SecretId=sys.argv[1] ) munge_key = response.get('SecretBinary') print(munge_key) print("Writing shared key to /etc/munge/munge.key") file.write(munge_key)Run this script, supplying the arn you copied from Cluster A as the first argument. Then change the ownership and permissions of
/etc/munge/munge.keytomungeuser only.sudo su pip3 install boto3 python3 download_munge_key.py 'arn:aws:secretsmanager:us-east-2:822857487308:secret:MungeKey-yYkLFE' chown munge:munge /etc/munge/munge.key chmod 600 /etc/munge/munge.key -
Change the
AccountingStorageHostto the hostname of Cluster A, i.e.ip-172-31-31-129:$ sudo vi /opt/slurm/etc/slurm_parallelcluster.conf ... AccountingStorageHost=ip-172-31-31-129 -
Next restart
munge,slurmctld, andslurmdbd:sudo systemctl restart munge sudo systemctl restart slurmctld sudo systemctl restart slurmdbd
5. Test
Now that we’ve setup the clusters we can run:
sacctmgr show clusters
You should see two clusters, if you don’t make sure you change the AccountingStorageHost on Cluster B to point to Cluster A and restart the slurm daemons and munge.
   Cluster     ControlHost  ControlPort   RPC     Share GrpJobs       GrpTRES GrpSubmit MaxJobs       MaxTRES MaxSubmit     MaxWall                 QOS   Def QOS
---------- --------------- ------------ ----- --------- ------- ------------- --------- ------- ------------- --------- ------------------------------- ---------
Cluster-A   172.31.31.129         6820  9984         1              normal
Cluster-B    172.31.30.55         6820  9984         1              normal
Now submit a job from Cluster B to Cluster A:
sbatch --cluster Cluster-A --wrap 'sleep 60'
SSH into Cluster A and voila, you’ll see the job queued!